
Dask cluster
Notes about running a small Dask cluster with Distributed workers in your CoCalc project for prototyping and educational use.
Start cluster
Create a Linux Terminal, e.g.
dask.termUse the split buttons at the top right to split it horizontally and vertically into 4 panels (see Frame Editor for more details).
Start the Scheduler in the first terminal panel:
dask-scheduler --dashboard-prefix $COCALC_PROJECT_ID/port/8787
The configuration for the dashboard is necessary to make it work at that URL:
https://cocalc.com/<PROJECT UUID>/port/8787/status
Start three works in the other 3 panels via:
dask-worker tcp://localhost:8786 \
    --dashboard-prefix $COCALC_PROJECT_ID/port/8787 \
    --local-directory ~/dask-worker \
    --nthreads 1 --nprocs 1 --memory-limit 256M
connecting to localhost (not the IP address, which is changing between project restarts!)
set the local directory to ~/dask-worker in your home directory (all their data will be there, when shutting down the cluster, you can get rid of all temp data at once by removing that directory)
threads: just one
processes: also just one
and a conservative memory limit per worker.
Note
If you run into memory-limit issues for individual workers, switch to running two clients with 512M memory limit. You can also get memory upgrades to be able to allocate more. In case you only run two workers, you can start htop in the 4th panel in order to keep an eye on all running processes in your project.
Note
Tipp: in each panel of the terminal, there is an icon with a “rocket”. Click it to open up a startup initialization script of that very panel. Paste these commands right there, and the next time you start your project and open up that terminal (just keep that tab opened), all init commands for each panel will run. That way, your little cluster is always spun up when you work in your project. If there is an issue, run Ctrl-c and then Ctrl-d to interrupt and exit the running instance. It will respan and run that init command again…
Connect with a client
Create a Jupyter Notebook, e.g.
dask.ipynb.Configure Dask to set the temporary directory to be in your project’s files (the /tmp directory is virtual and in memory). The config below also enables work stealing, because we’re on the same node anyways. The snippet below should get you started:
import dask
import dask.distributed
import os
dask.config.set({
    'temporary_directory': os.path.expanduser('~/tmp'),
    'scheduler.work-stealing': True
})
Create you client, it should return a general status information (how many clients, memory, etc.):
from dask.distributed import Client
client = Client('127.0.0.1:8786')
client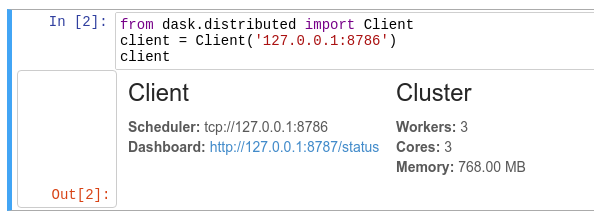
If that worked, congratulations! You can start submitting tasks to your little cluster!
From here, you can also check the actual configuration:
dask.config.config
First example
To get started with a small example, let’s compute the sum of the first 1000 integers using Bags:
import dask.bag as db
nums = db.from_sequence(range(1000), npartitions=10)
nums.sum().compute()
It should return:
499500
Dashboard
Once your cluster is running and the scheduler’s prefix is setup correctly (see above), open the dashboard’s URL in a new browser tab. Make sure to replace the placeholder with your project’s UUID:
https://cocalc.com/<PROJECT UUID>/port/8787/status
For example:
https://cocalc.com/4c4ad130-62bf-47f0-8dbd-6bd1fef1a6fa/port/8787/status
Multi-project/-node cluster
This setup runs several workers inside the same project. This allows to scale up with the number of available cores and memory, but no further. Right now, it is not possible to define a cluster made of several projects on CoCalc.