CoCalc Enhancements to Jupyter Notebooks
These enhanced features are available in CoCalc Jupyter notebooks:
cell-insert bar
If you hover your cursor over the space between two consecutive cells in a Jupyter notebook, a blue bar will appear:

Clicking the bar anyplace between the buttons, or clicking the “Code” button, will insert an empty code cell.
Shift-clicking the bar between the buttons, or clicking the “Text” button, will insert an empty text cell.
Clicking the “Paste” button can paste content from the clipboard into a new cell, but note that some browsers will warn you or prohibit this action for security reasons.
Clicking the “ChatGPT” button will pop up a prompt allowing you to describe what you want and have ChstGPT write code for you. The code, with comments, will appear in a new cell. Note that code created by ChatGPT may have errors, so it needs to be checked. Often, even if the code has errors, it can show you new ways to solve your problem.

Use “ChatGPT” button to write code in a new cell
consecutive cell numbers
Cells are numbered consecutively at upper right. Unlike execution numbers shown in brackets at left, these don’t change when you re-run a compute cell or go blank when you clear output, and markdown cells are numbered as well as code cells.

compute cell consecutive numbers and run time
drag-and-drop
You can drag and drop images into markdown cells:
1. If you have a markdown cell and are not actively editing it, there is an image icon/button on the far right of the cell. Just click that and you can then select an image from your computer. It’ll be uploaded and inserted into the cell.

Click image icon to open a drop zone for image placement
2. If you have a markdown cell and are editing it, select “Edit –> Insert image in selected markdown cell…” from the menu and proceed as above.
3. The markdown editor in Jupyter doesn’t yet support direct drag-and-drop and copy/paste of images, but it probably will soon. See https://github.com/sagemathinc/cocalc/issues/4762
nbgrader integration
CoCalc offers nbgrader support without adding separate Jupyter extensions. This ehancement is in under active development. See nbgrader in CoCalc for more information.
protect cells from deletion
You can protect markdown and code cells from deletion in a Jupyter notebook using “Delete protection – toggle whether cells are deletable” in the “Edit” menu. Note that this only blocks deletion using the Jupyter user interface; it is possible using other means to circumvent this.
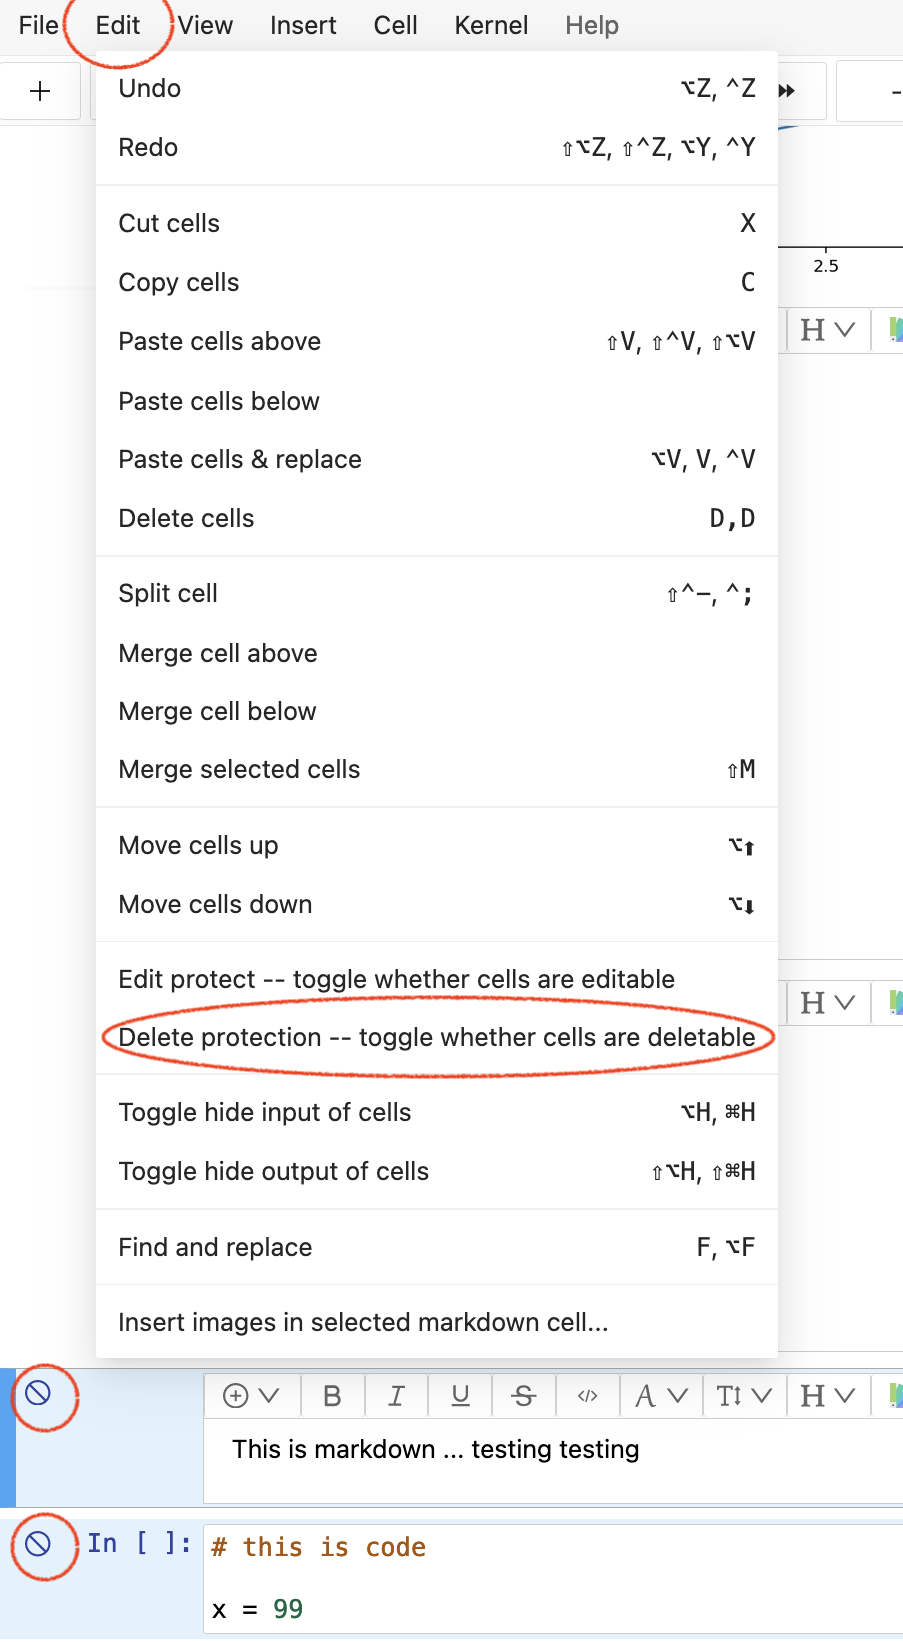
protecting cells from being deleted
protect cells from editing
You can prevent editing of markdown and code cells in a Jupyter notebook using “Edit protect – toggle whether cells are editable” in the “Edit” menu. Note that this only blocks editing using the Jupyter user interface; it is possible using other means to circumvent this.
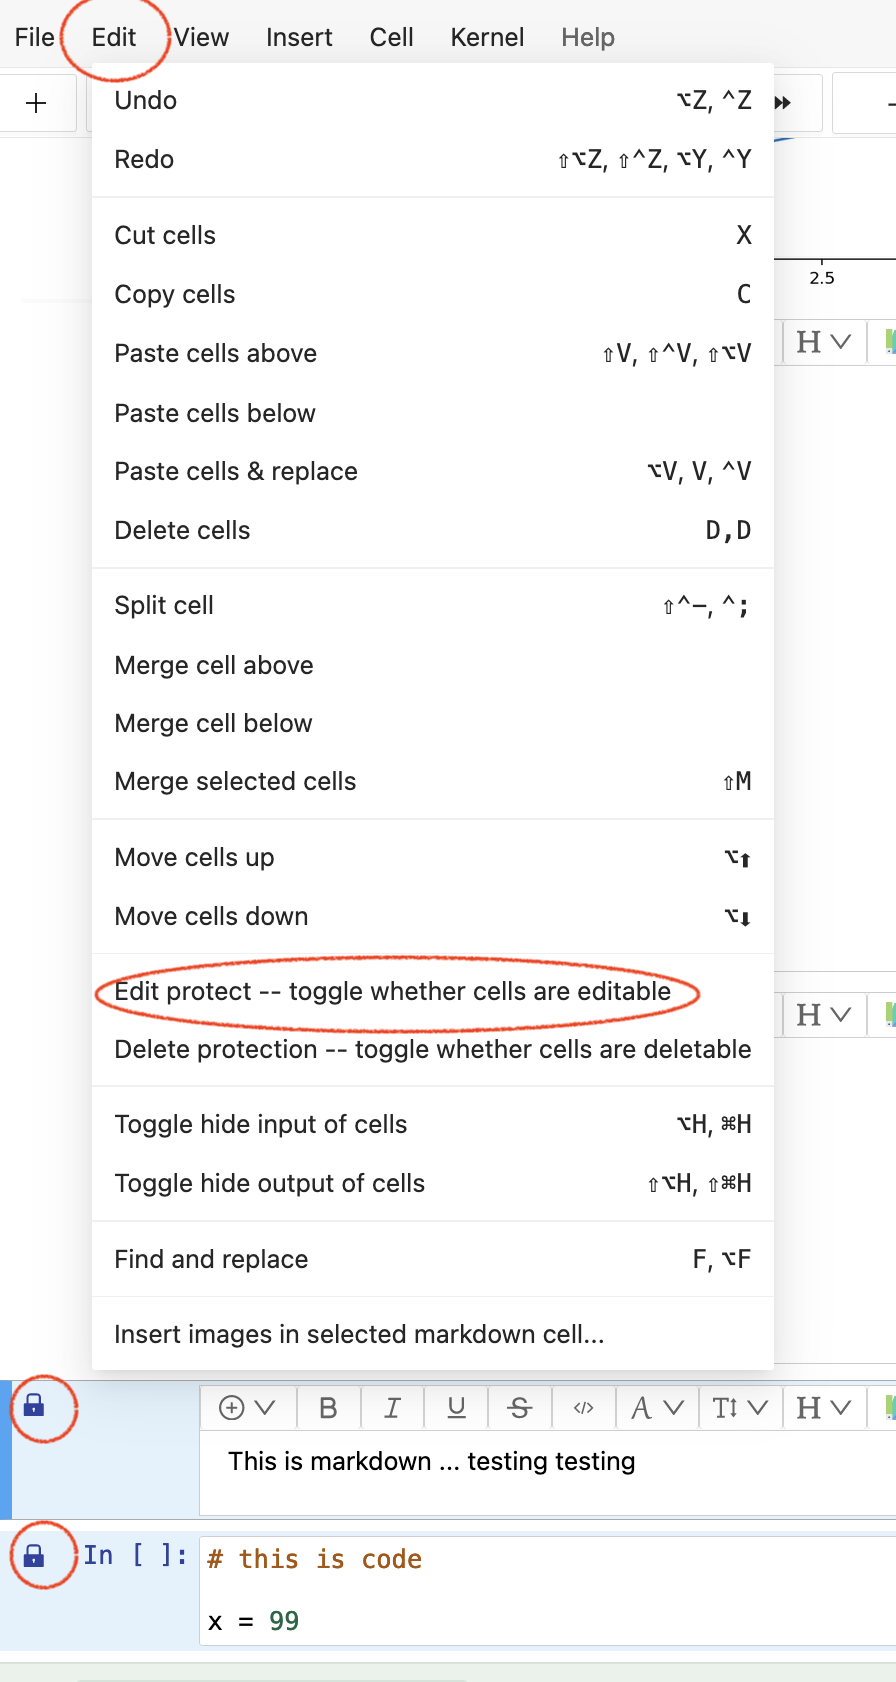
protecting cells from being edited
run time for compute cells
When a compute cell is executed, the amount of time it takes is displayed at upper right. See the figure above under consecutive cell numbers.
slideshow
CoCalc notebooks offer you a shortcut for making a slideshow. Select “View” > “Cell Toolbar…” > “Slideshow” to add a Slide button above the right of each cell. For each cell, you can specify whether it is a slide, subslide, or fragment. To view the slideshow, click the “Slideshow” in the “Notebook” menu at the top of a notebook, or select “File” > “Slideshow”, or split the frame and change one of the resulting frames to “Slideshow”. The latter allows you to view the original notebook side-by-side with the slides.
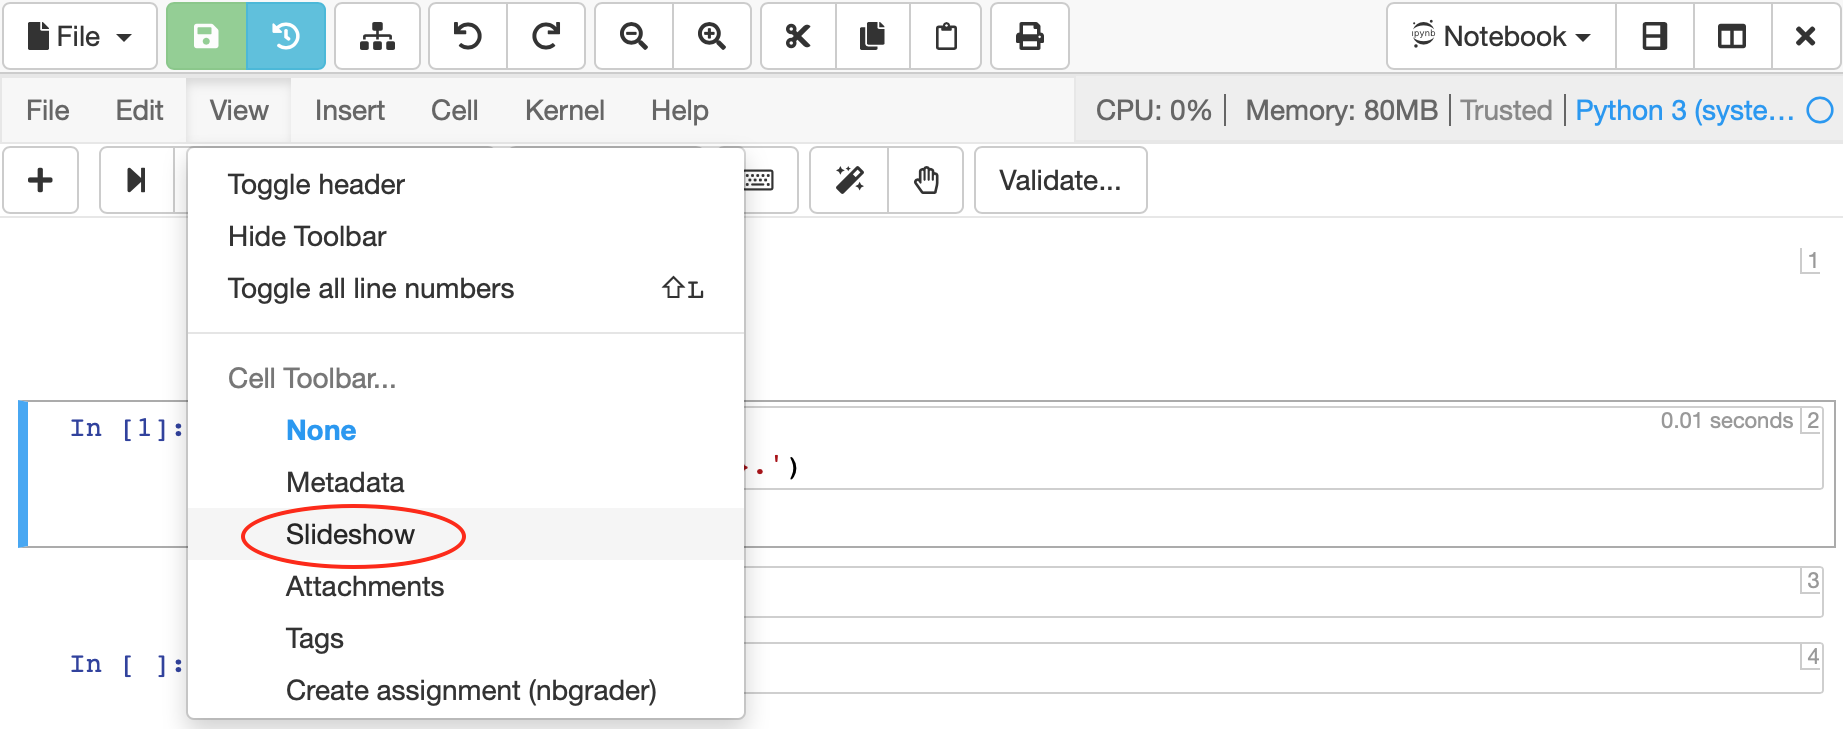
enabling “Slide” button in cell toolbar
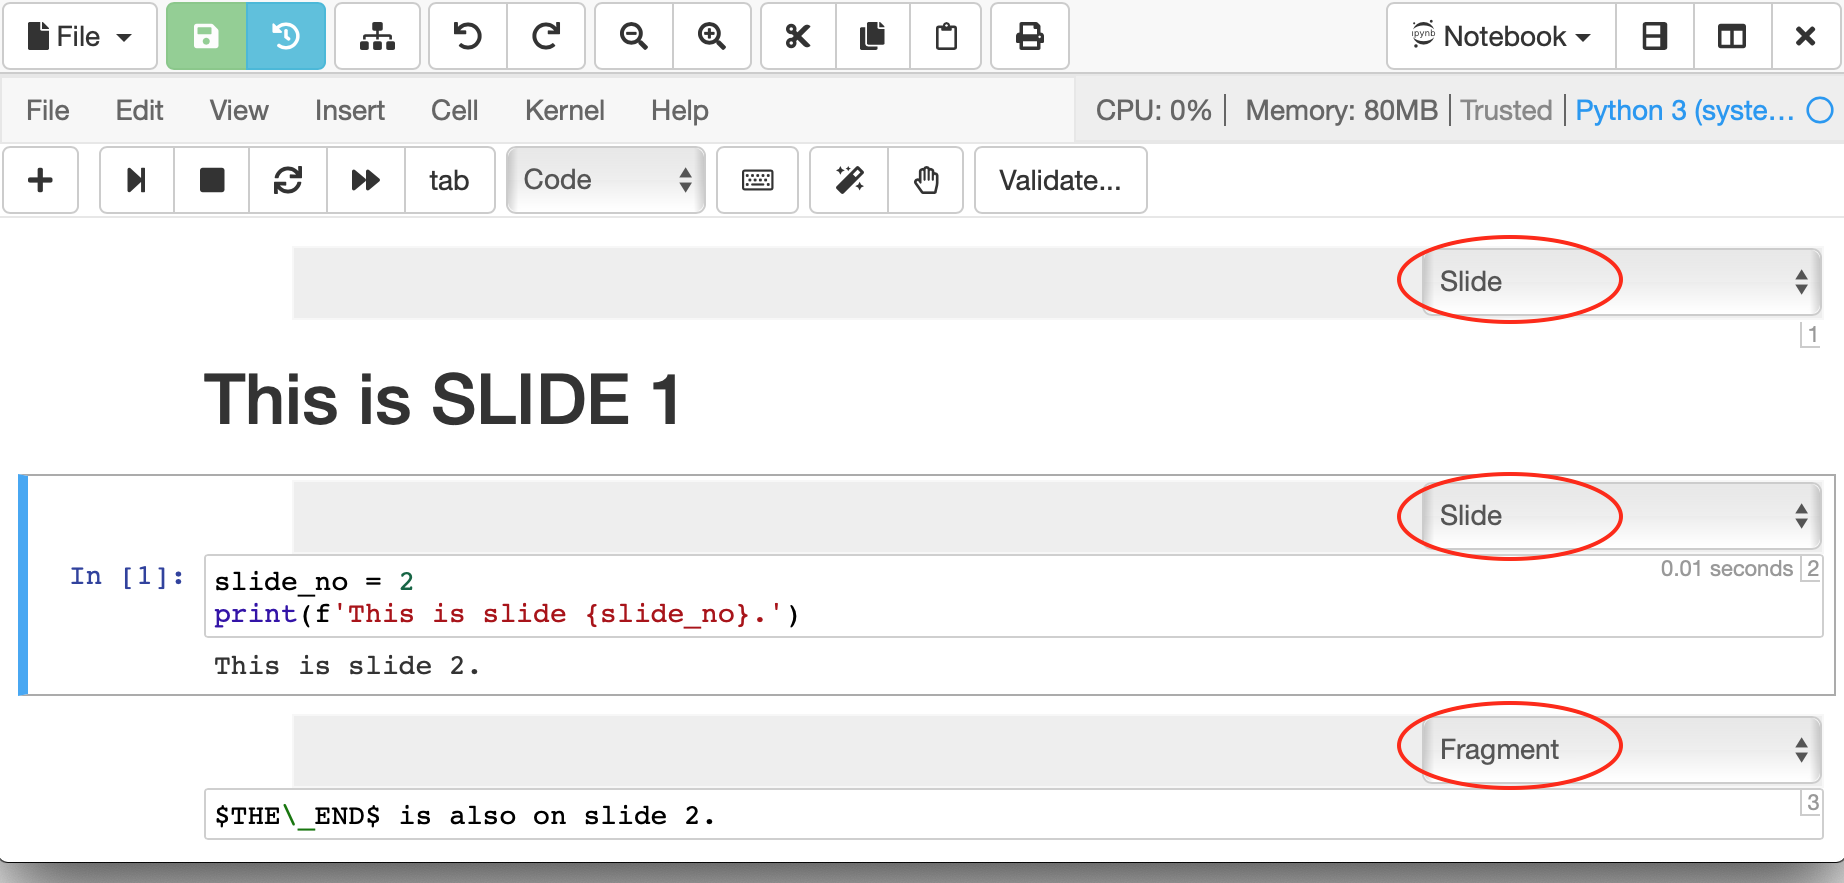
selecting slide type for each cell
When presenting, the next slide is to the right, while the next subslide is below. Fragments are revealed within the present slide. Click in the slideshow and then click “?” to see a list of keyboard shortcuts. If you modify the notebook, you can update the slideshow by clicking in the toolbar above the show and clicking “Build”, or by clicking “File” in the toolbar above the notebook and again selecting “Slideshow”.
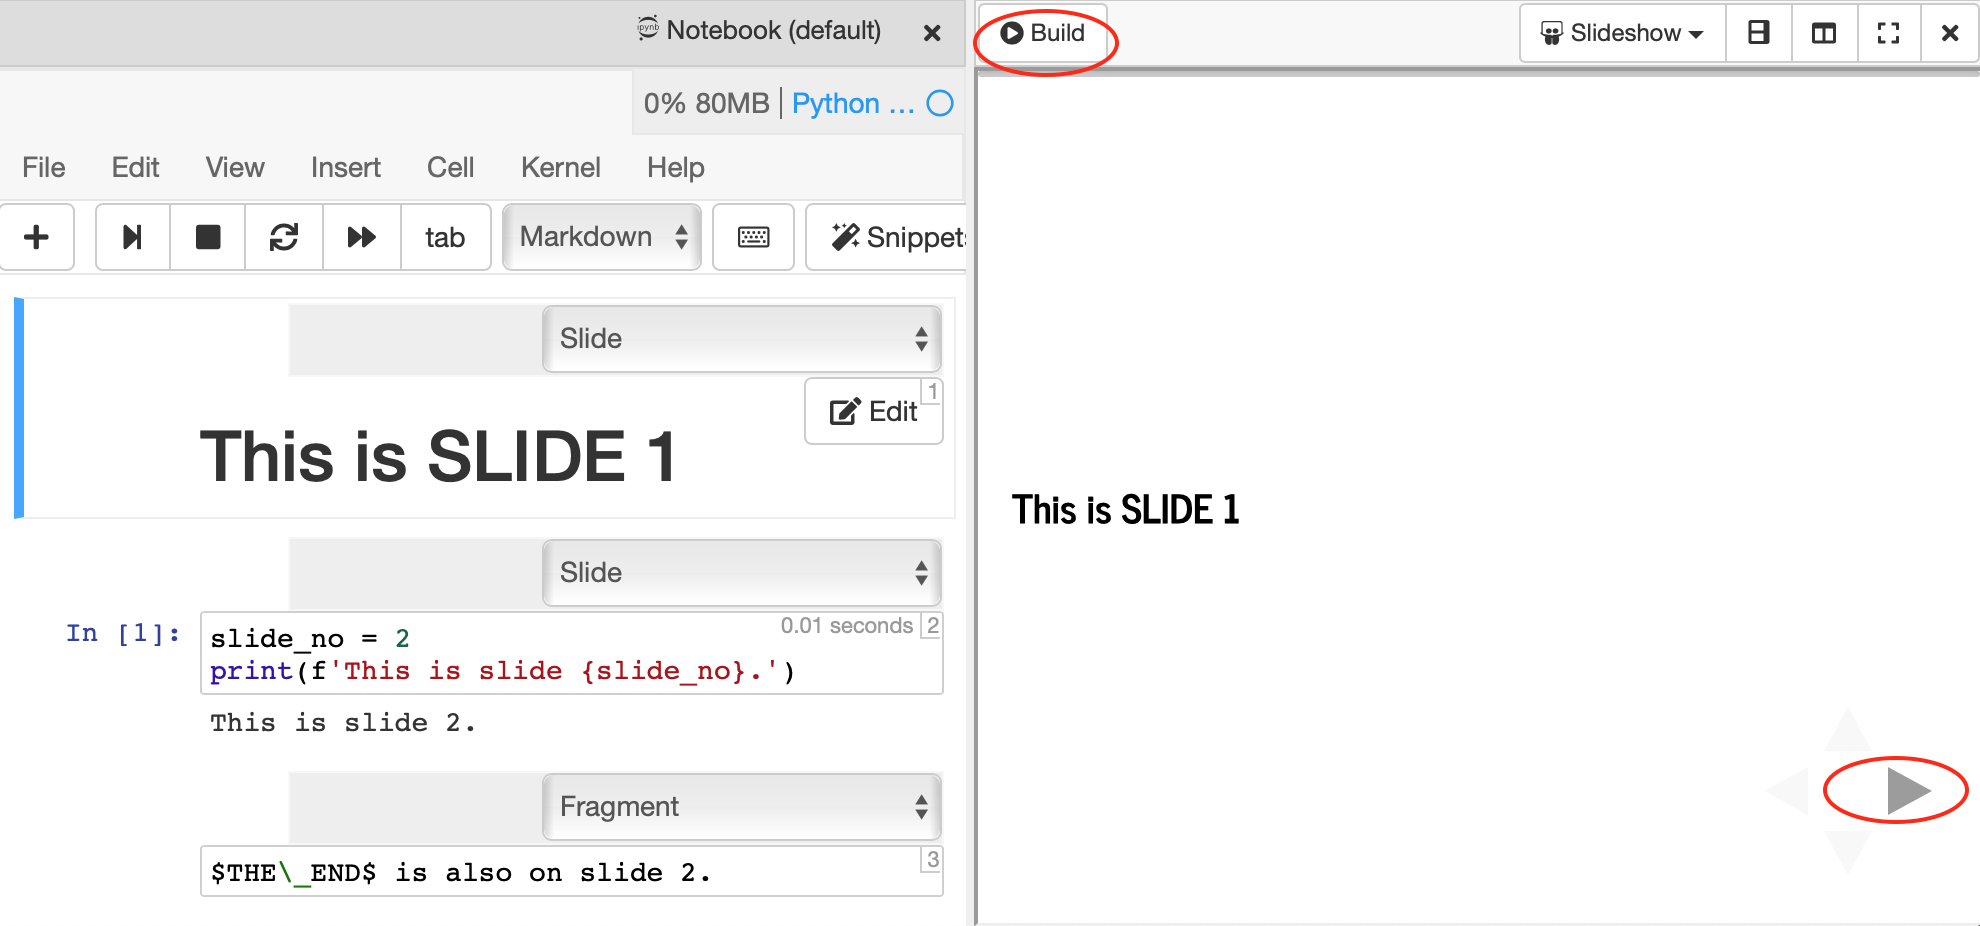
original notebook side by side with slideshow
Note
The legacy method of creating and presenting a slideshow by using a separate Linux terminal command and starting a small web server is still available by clicking “File” > “Slideshow via nbconvert…”.*
table of contents
Table of contents sets the indentation level based on the markdown heading level, i.e. “#” for top level, “##” for second level, etc. Click the “Contents” button in the “Notebook” menu at the top of a notebook, or select “File –> Table of Contents”, or split the frame and change one of the resulting frames to “Table of Contents”. Each entry in the table of contents is a clickable link that takes you to the corresponding cell in the notebook.
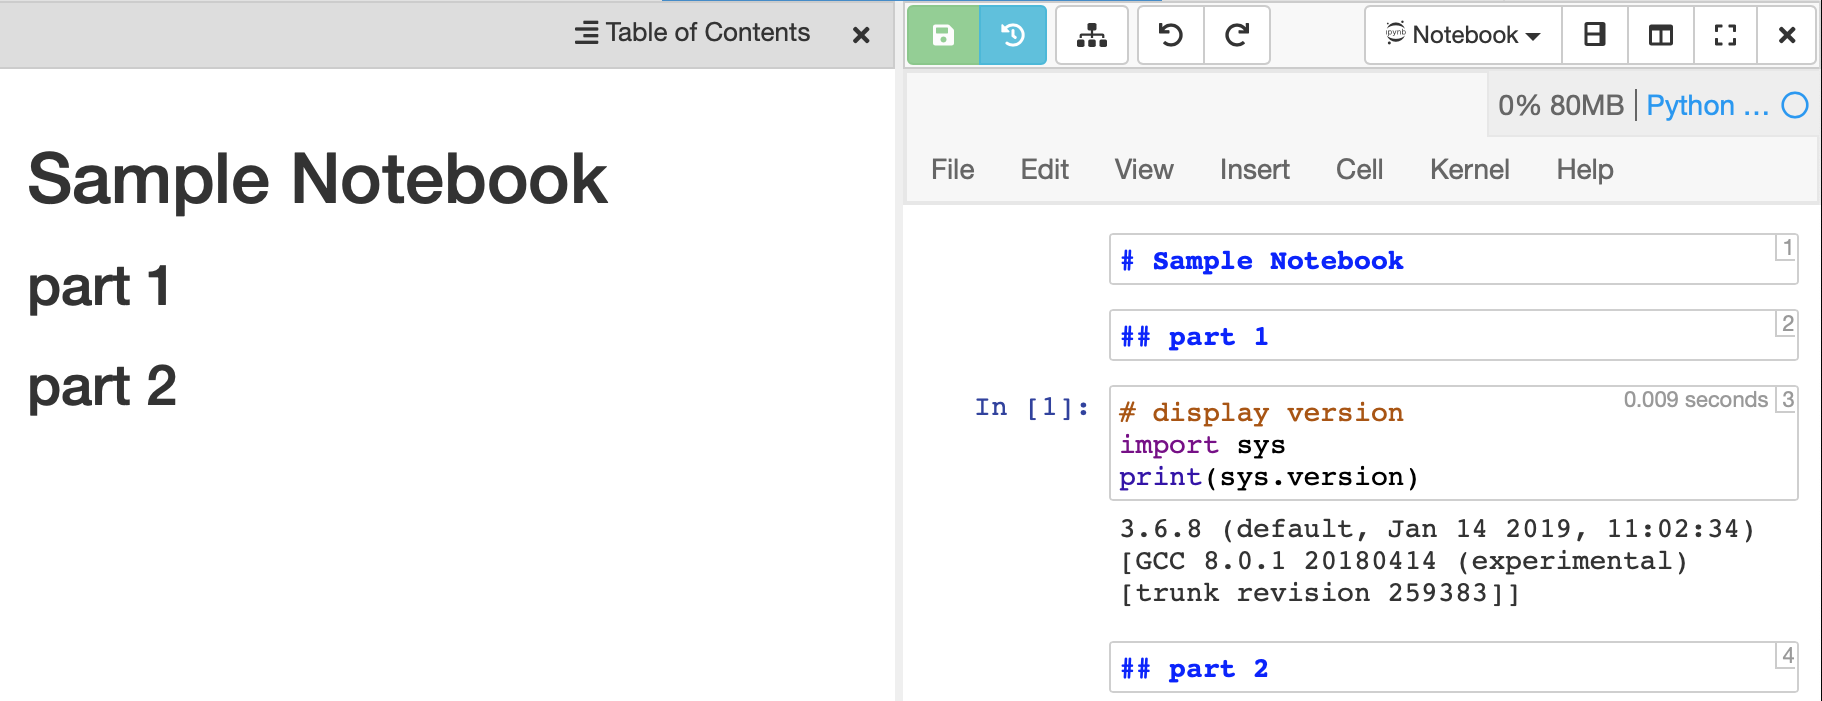
table of contents
widgets in CoCalc
Jupyter Widgets are Python objects that let you build interactive GUIs for your Jupyter notebooks. CoCalc Jupyter notebooks combine the interactive capabilities of Jupyter widgets with the usual advanced features of the CoCalc platform, including real-time collaboration, TimeTravel, and Side Chat.
A good way to get started using Jupyter widgets is to go through the Widget List in the main widgets documentation.
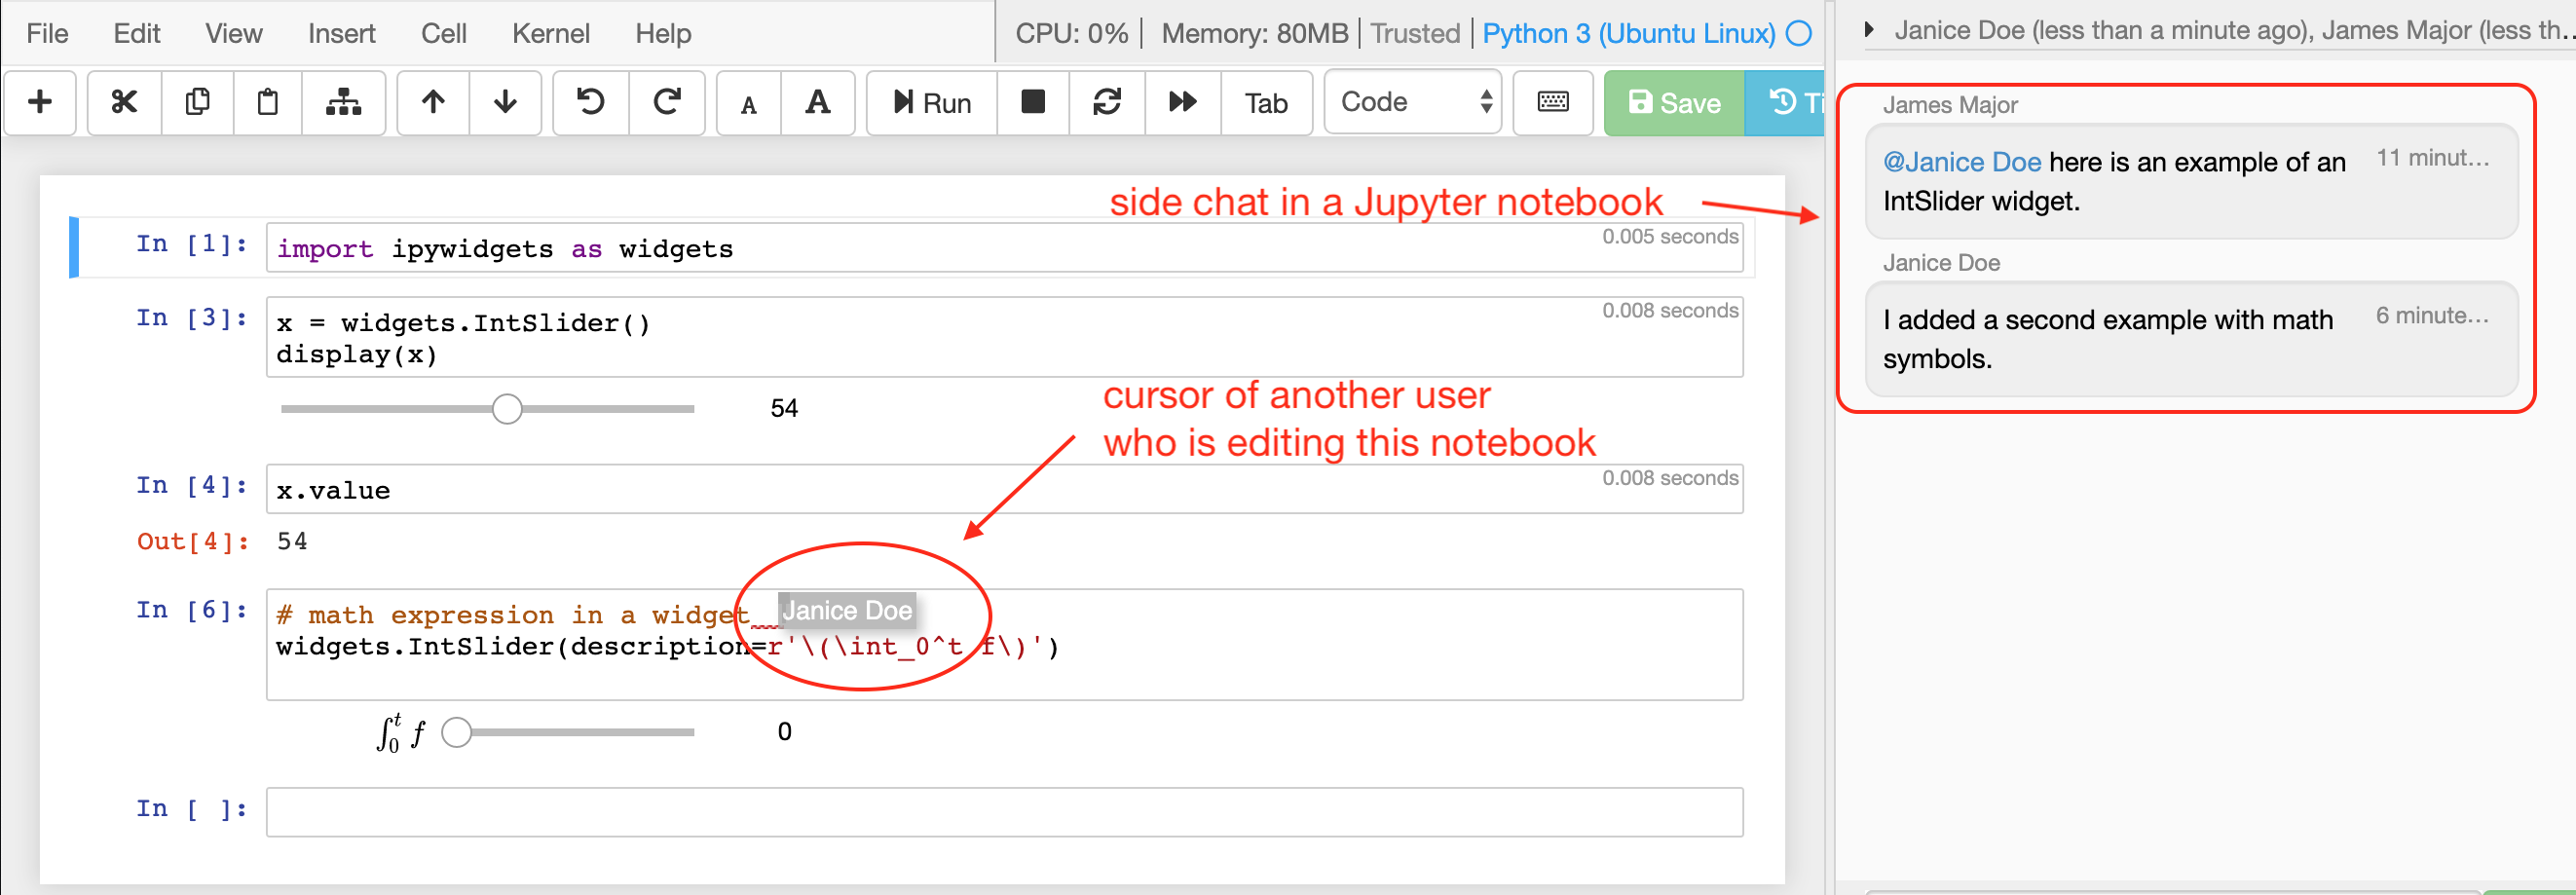
CoCalc Jupyter notebook with Jupyter Widgets
For more information on the implementation of Jupyter Widgets in Cocalc, including support for real-time collaboration, see this video presentation: Jupyter Widgets in CoCalc.
