
Compute Servers
CoCalc’s Most Unique Offering
A compute server in CoCalc brings you closer to your dreams using an extremely powerful and flexible combination of
- Reliable hardware resources - ranging from minimal to MASSIVE!
From 1/4 to over 400 CPU cores on a single node plus cluster support
From 1 to over 10,000 GB RAM
From 10 to over 1,000,000 GB disk
From a single T4 (or no GPU at all) to 8x H100, with tons of options in between, including access to L4 and L40, RTX-A4/5/6000, and A100 with 40 GB or 80 GB of RAM
- Access to multiple clouds - in a unified way that does not hide their superpowers!
Running out of disk space? Increase it seamlessly on the fly!
Can deal with occasional interruptions? Benefit from Google discounts on spot instances!
Need sustainable GPUs and free network? Pick Hyperstack!
Have a powerful laptop or a cluster? Turn it into a cloud!
- Finely pre-configured software images - don’t waste your time!
SageMath, Anaconda, Google Colab, Julia, PyTorch, Tensorflow, Open WebUI, etc.
Most things work right out of the box
Install anything as root, use Docker and Kubernetes
Launch JupyterLab or VS Code with just one click
- CoCalc’s renowned interface - honed from years of experience and feedback!
Code files are synchronized with your CoCalc project’s file system
Real-Time Collaboration and AI Assistant with a plethora of LLMs
User friendly version control TimeTravel (or your beloved git)
- CoCalc’s dedicated team - support you can rely on!
Benefit from our expertise, focus on YOUR work
Enjoy a personable approach, schedule a video chat with us anytime
Request custom images and features
- Transparent billing - no surprises!
See competitive prices while configuring your server
Pay by the second when resources are in use
Study a detailed list of all transactions
Get daily statements by email
Examples of Compute Server Uses
You may find something useful, at least some inspiration, in our growing collection of tutorials that showcase compute servers. You can simply read them or follow along in video format. Here CoCalc’s CEO and Founder William Stein explains how to run the Google Colab environment on compute servers and use either Tensorflow or PyTorch:
Do I Still Need a License?
That is a great question! Your CoCalc project is still used for file syncing and tracking compute server status, so you will have smoother experience if your project has adequate resources, in particular sufficient RAM. In most cases the basic subscription will work great!
Creating a Compute Server
There are multiple ways to create a compute server, one of them is to click the Server button:

Creating a Compute Server
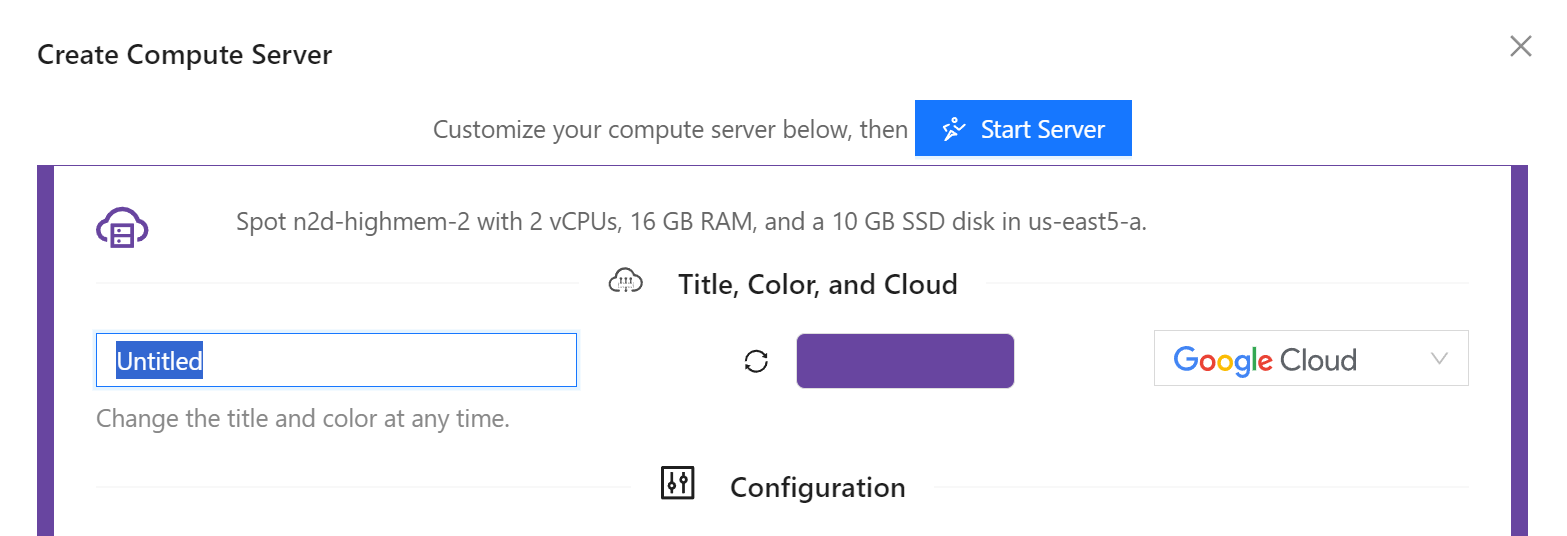
The first settings allow you to give your server a name, pick a colour to easily distinguish where your are working, and choose the cloud provider used for your server:
Creating a Compute Server
Hint
You can actually be your own “cloud provider” by picking OnPrem hosting! You can use not only your own physical hardware, but also virtual machines from providers we are not currently integrated with. This is one of the ways we support CoCalc OnPrem.
Configuration parameters vary depending on your hosting choice, but typically you can select the desired software image and hardware configuration including GPU(s).
If you are going to write code using CUDA libraries, choose the “Cuda Toolkit” image. If you want to accelerate PyTorch computations with a GPU, choose the “PyTorch” image. If you want to use SageMath, choose the “SageMath” image. Note that image selection does depend on the presence of a GPU.
Adjust the hardware parameters according to your needs. Take some time to look over the options! You will be able to edit CPU and RAM when the machine is off (if it also has a GPU, currently it will have to be deprovisioned), so if you don’t quite know what you need - make a guess! If it turns out that you need something more or less powerful, you can easily make an adjustment. For example, in this video William uses a machine with 60 CPU cores and 240 GB of RAM to build SageMath from source in under 18 minutes:
After the build is done, William changes the machine type to have only 2 CPU cores and 8 GB of RAM - such a machine is very cheap to run even 24/7! The disk size can be increased even when the machine is running. Unfortunately, you currently can’t move the machine from one region or zone to another unless it is deprovisioned, and the prices do depend on the region - this will change in the future.
Start your compute server!
Using a Compute Server
Your freshly created compute server does not replace your CoCalc project, but rather complements it. This is why you have to explicitly indicate that you want to run your terminal or Jupyter notebook on a particular compute server, and you can have multiple compute servers running at the same time!
Hint
You can get close to a feeling of working “just on a compute server” if you switch to it in the file Explorer - you will be able to see its local files and all files that you open will run on the same compute server by default. See Compute Server Filesystem below.
To run a Jupyter notebook on a compute server, click the Server button and select the one you want to use:
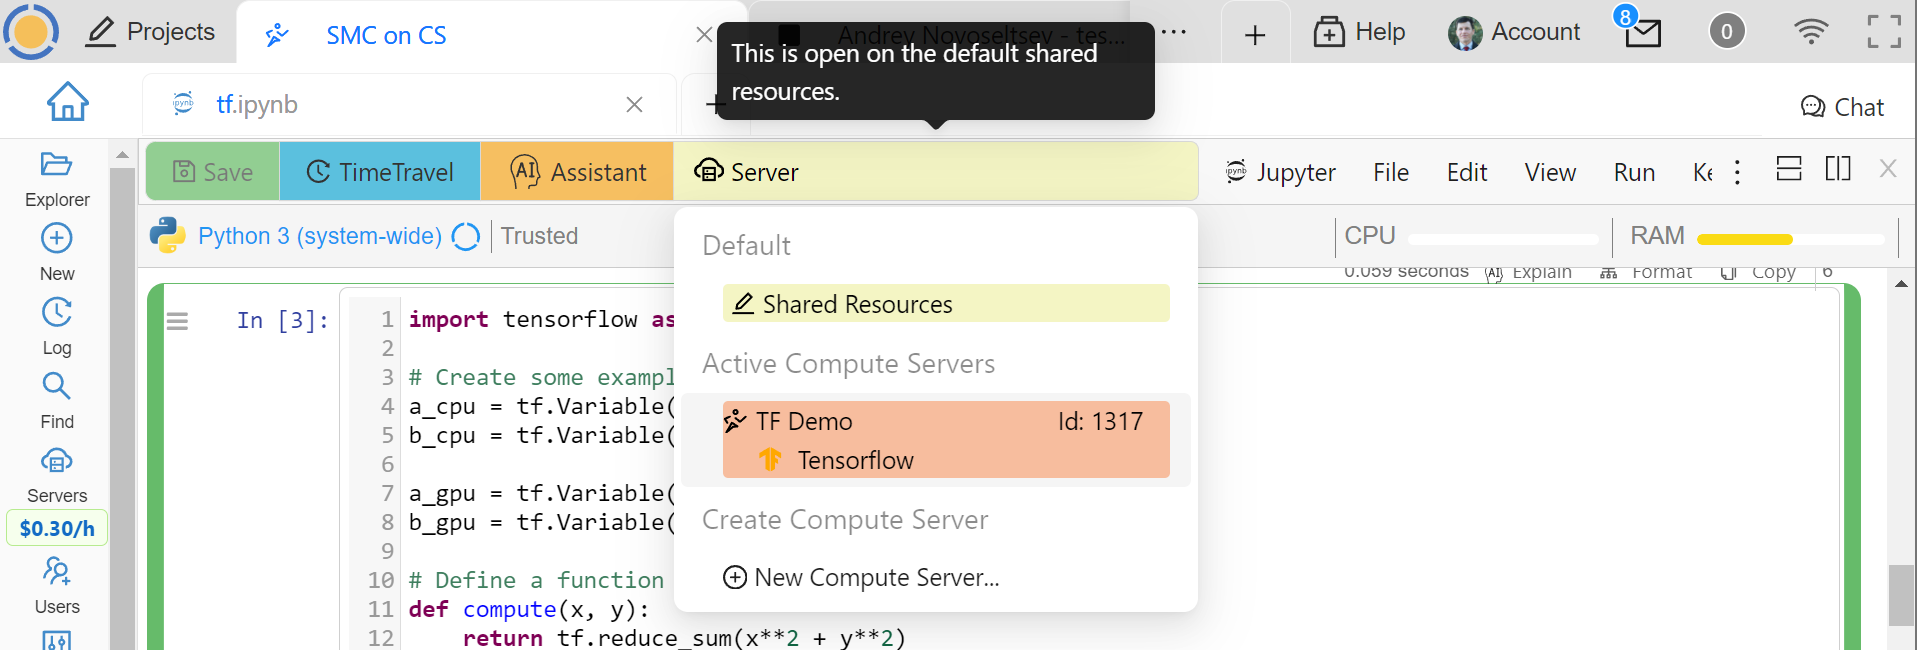
Connecting a Compute Server to a Notebook
You will get a confirmation dialog, reminding you that the current kernel will be stopped and a new one will have to be started on the compute server:
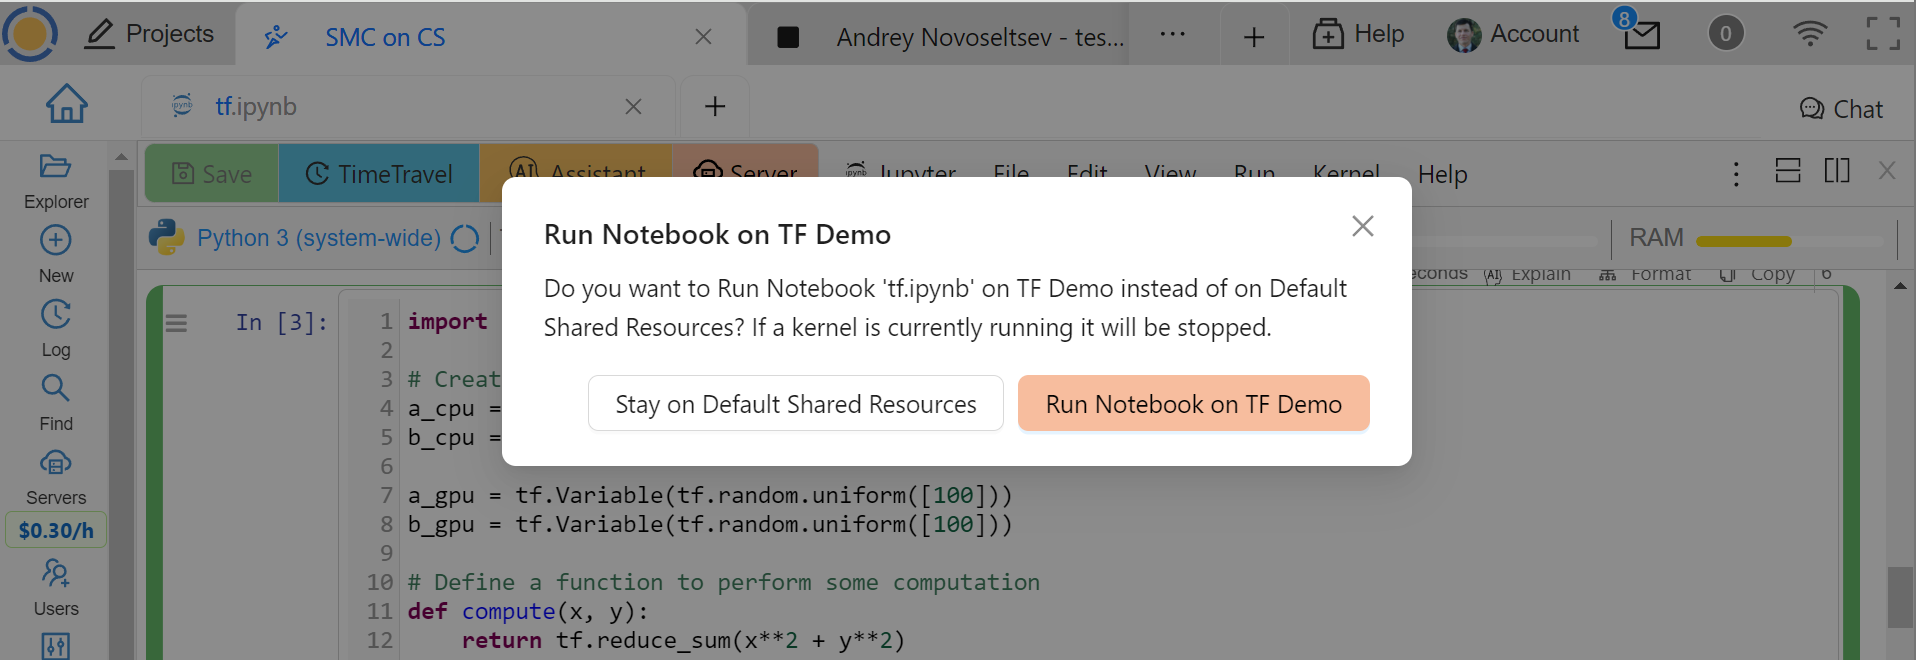
Confirming the Choice of a Compute Server
It is possible that the type of kernel used in your notebook is not available on the compute server (and vice versa). In this case you will need to choose another one:
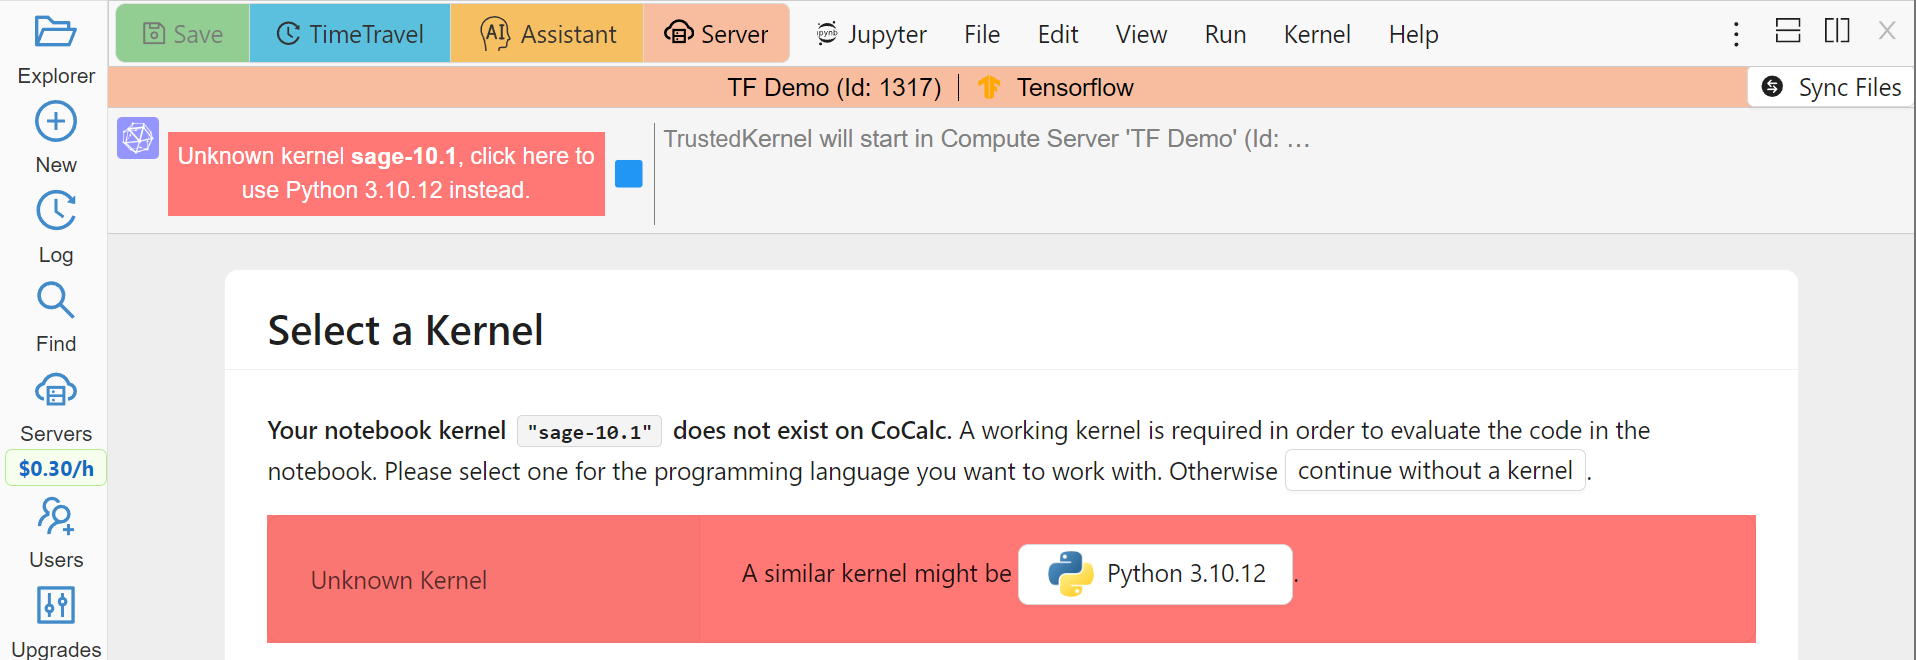
Picking a Kernel on a Compute Server
The server bar appearing above the notebook allows you to quickly see where the notebook is running and shows the name you have given to this server, its unique ID, and the image used. Click on this bar to see more details about the server:
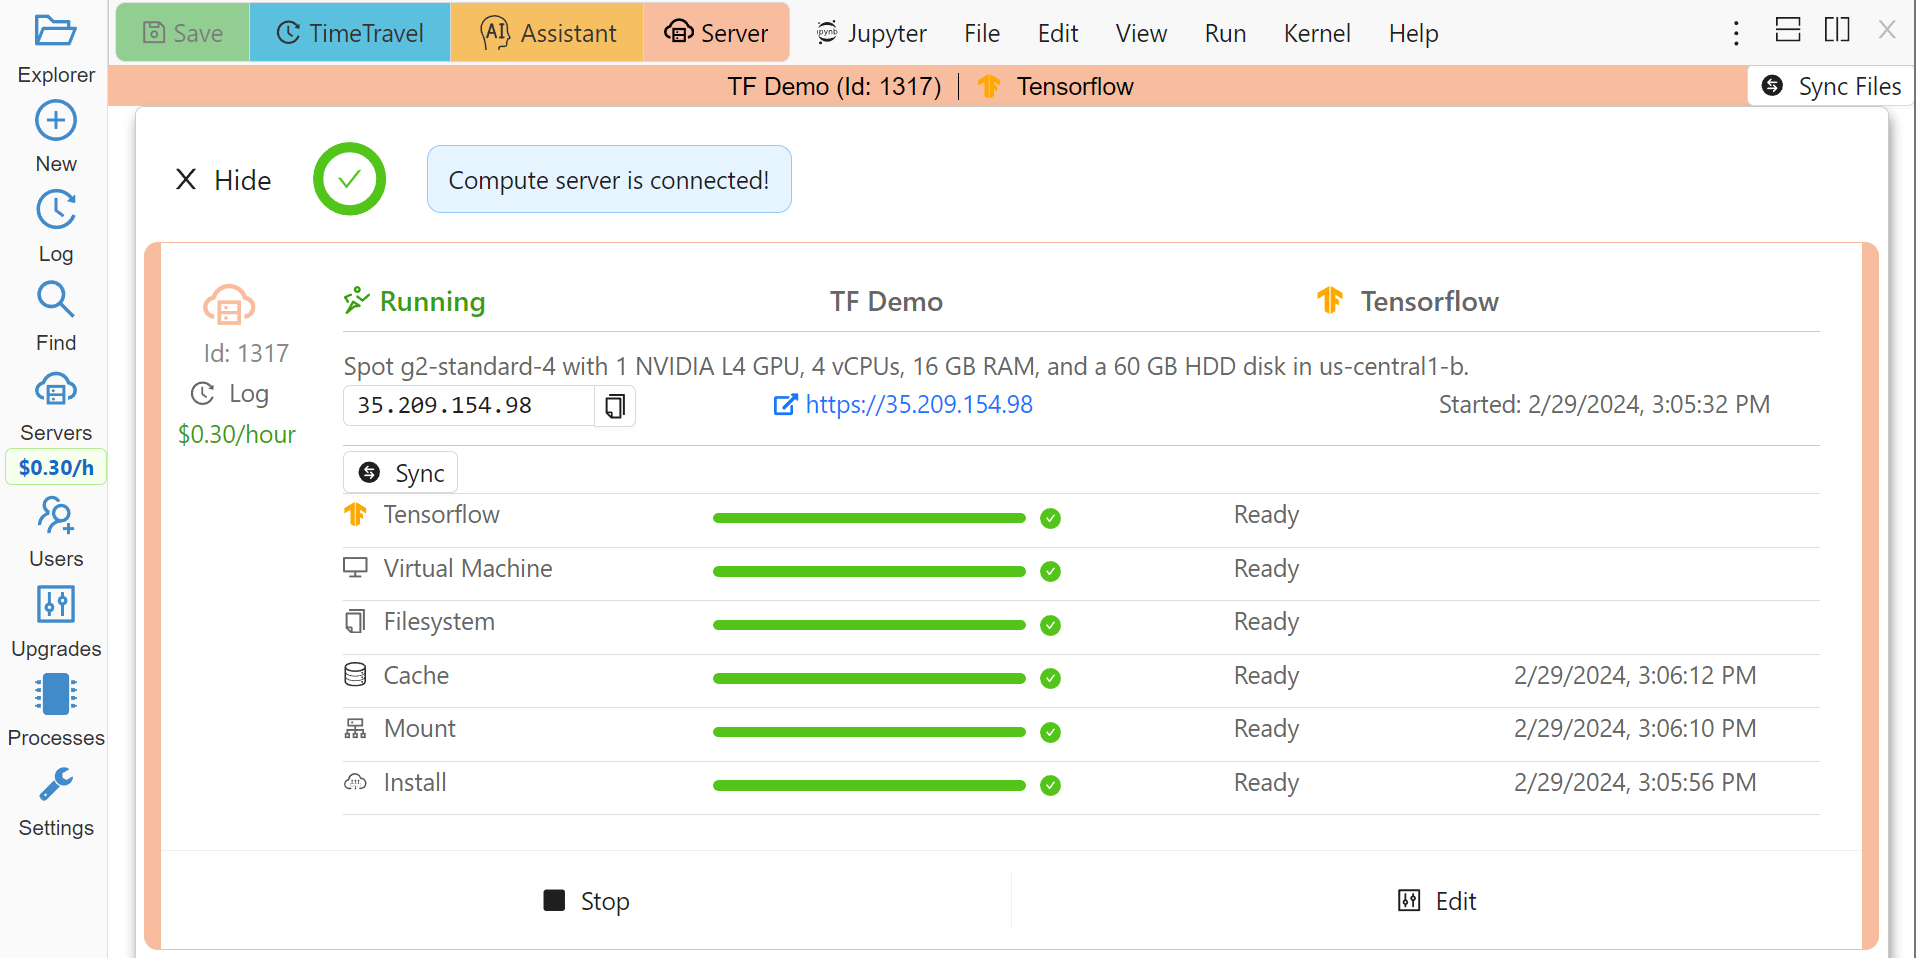
Compute Server Status
In order to use the Linux command line, e.g., compilers, etc., create a terminal file (one ending in .term) and connect it to a compute server in the same way. If you chose the “CUDA Toolkit” image, then the nvcc command will be available for compiling .cu code. See this tutorial for details.
JupyterLab, VS Code, X11 Desktop
You can easily start your own instance of JupyterLab or VS Code on your computer server, as well as start using X11 Graphical Desktop. Simply click the dot menu in the compute server panel, make a choice, and follow instructions:
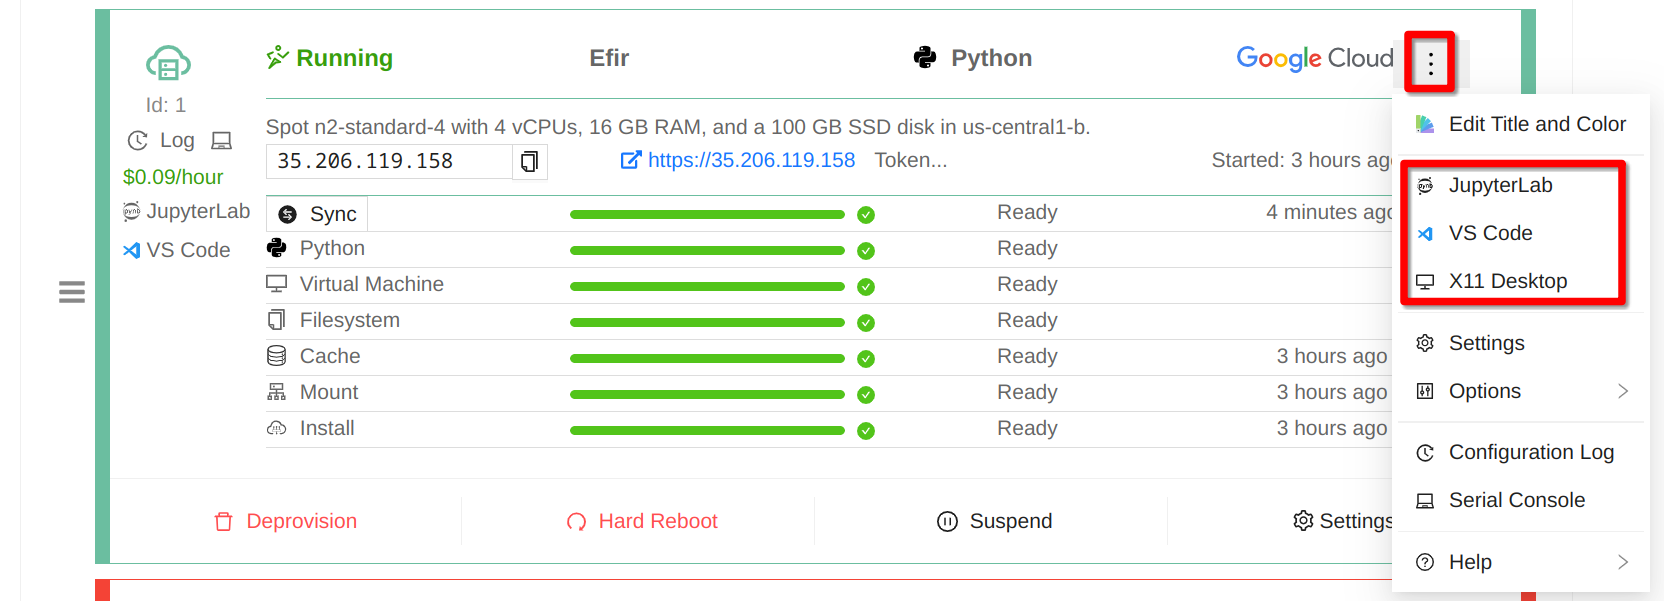
Compute Server Applications
Since you will be able to use these applications via direct connection to your compute server, you may enjoy lower latency than through the regular CoCalc interface, which may be especially noticeable for X11 Desktops. Of course, for this you have to create your compute server in a region geographically close to you. You are also free to install any system software you wish, and this is actually necessary for most of the software pre-installed in your Home Base.
Note that you can simultaneously use a direct connection to your server and the standard CoCalc interface, which may be convenient in some cases, e.g. copy-pasting in a terminal is easier. It may be handy to make use of DISPLAY variable:
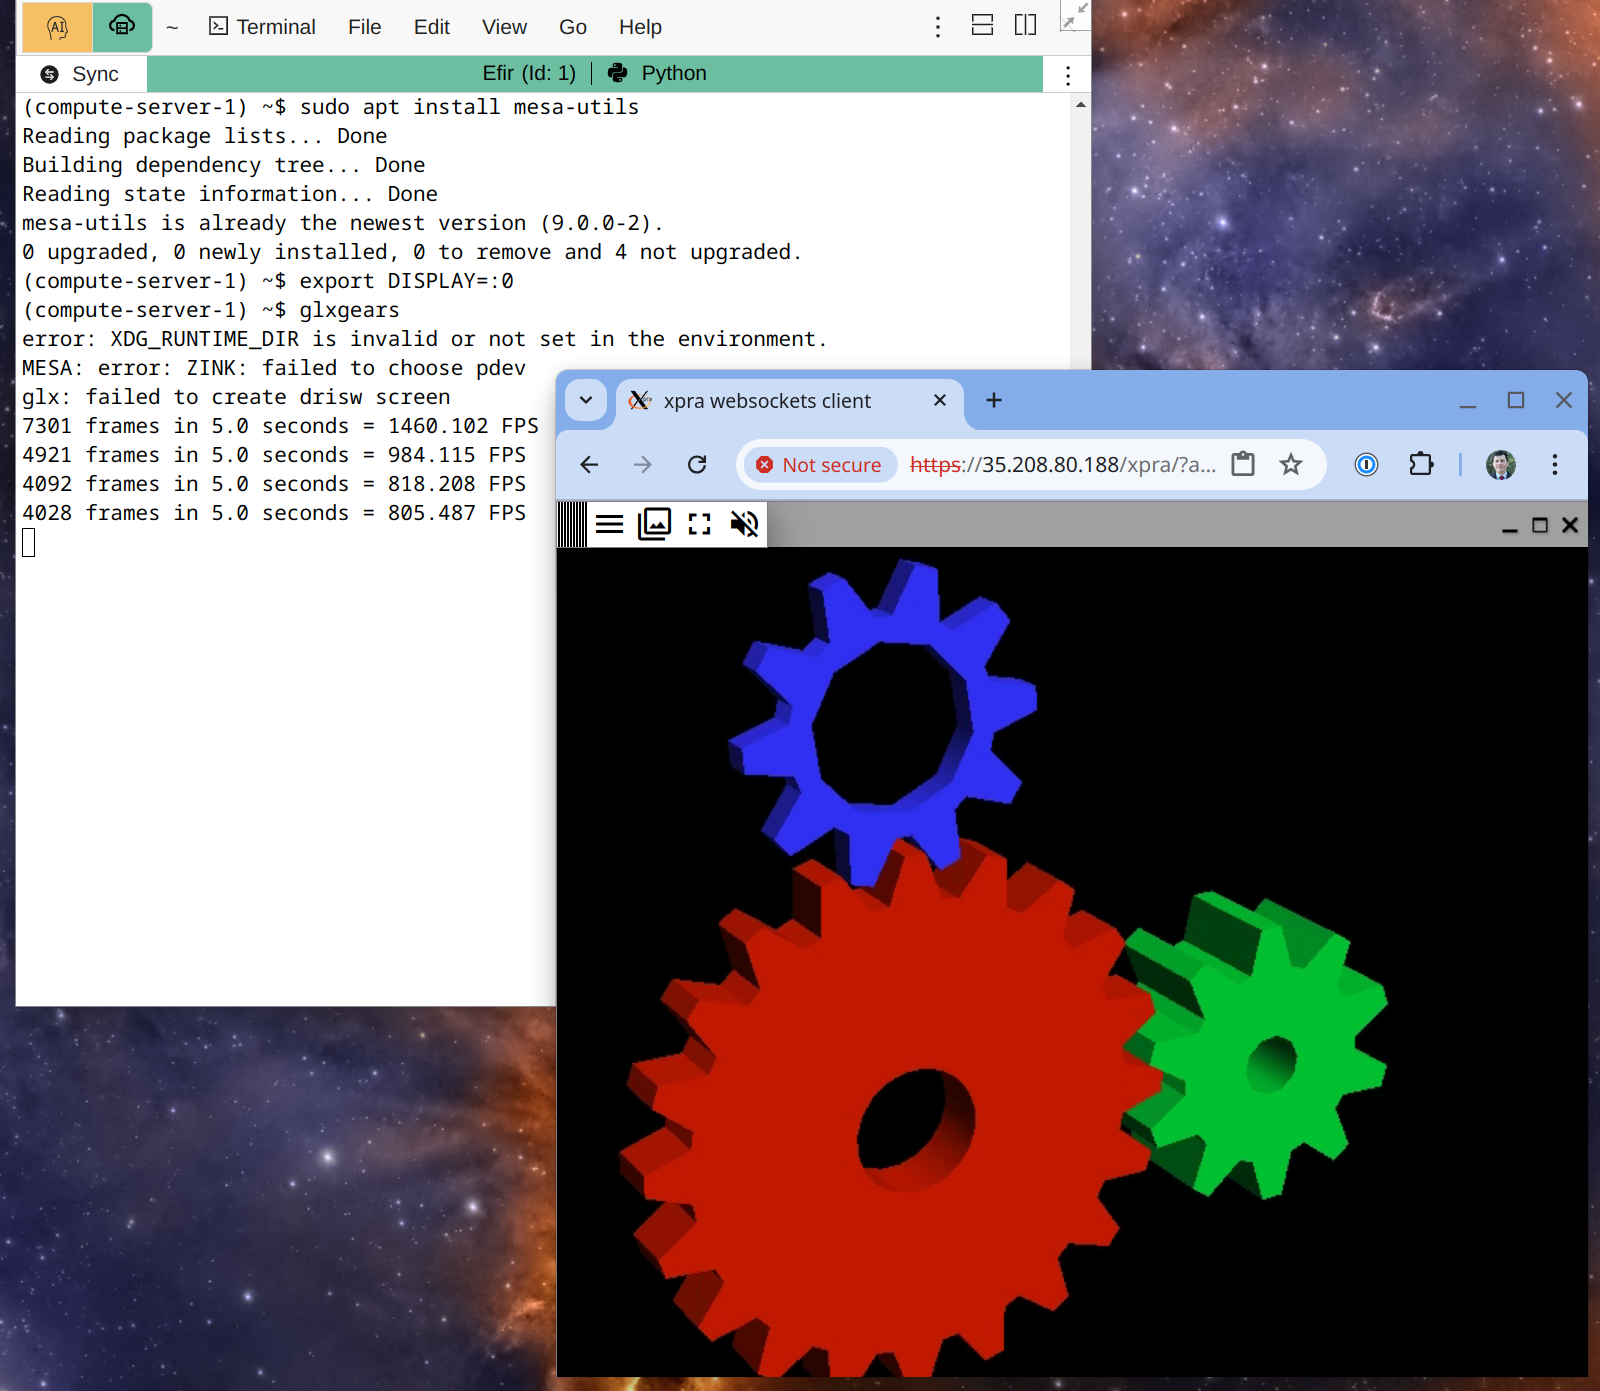
X11 Desktop on a Compute Server used from a Terminal in CoCalc
It may be handy also to install Google Chrome on your compute server and run it via X11 Desktop, since it will have access to all the local ports of the compute server where your applications may serve some data. To do this, run the following commands in a terminal:
wget https://dl.google.com/linux/direct/google-chrome-stable_current_amd64.deb
sudo apt install ./google-chrome-stable_current_amd64.deb
google-chrome --no-sandbox --disable-dev-shm-usage
Other Web Applications
While it may be useful to access web applications running on your compute server via X11 Desktop as explained above, it may be way more convenient to do so from a browser on your local machine. You can do so via advanced proxy configuration in the compute server settings:
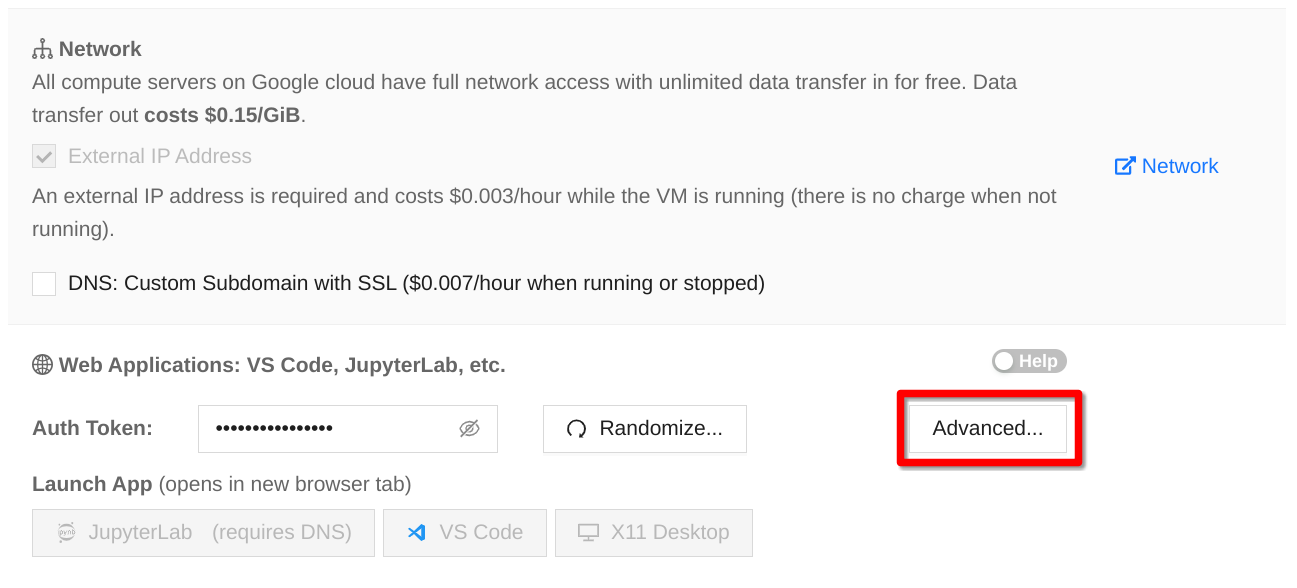
Accessing Proxy Settings
Once you click on Advanced button, you will be able to add your own server to the standard ones:
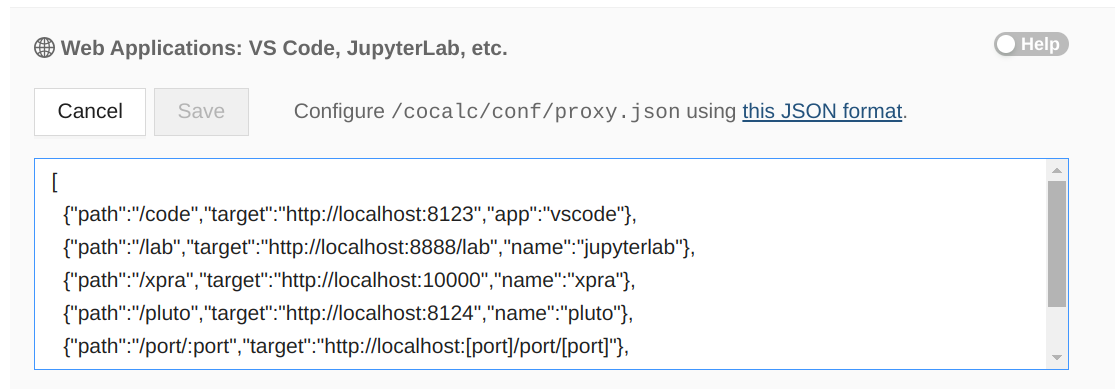
Proxy Settings
If all you care about is accessing your application running on port 8080, you can replace the configuration above with
[ { "path": "/", "target": "http://localhost:8080", options:{}, wsOptions:{}} ]
then go to the IP address of your server (displayed on its tile while running). You will likely get a security warning from your browser, unless you also configure a DNS record for your server and use that insted of the IP address.
Yet another option is to use port forwarding explained below.
Becoming root and Port Forwarding
You cannot become root or use sudo inside of a CoCalc project’s Home Base. If you try to, you will get a message like
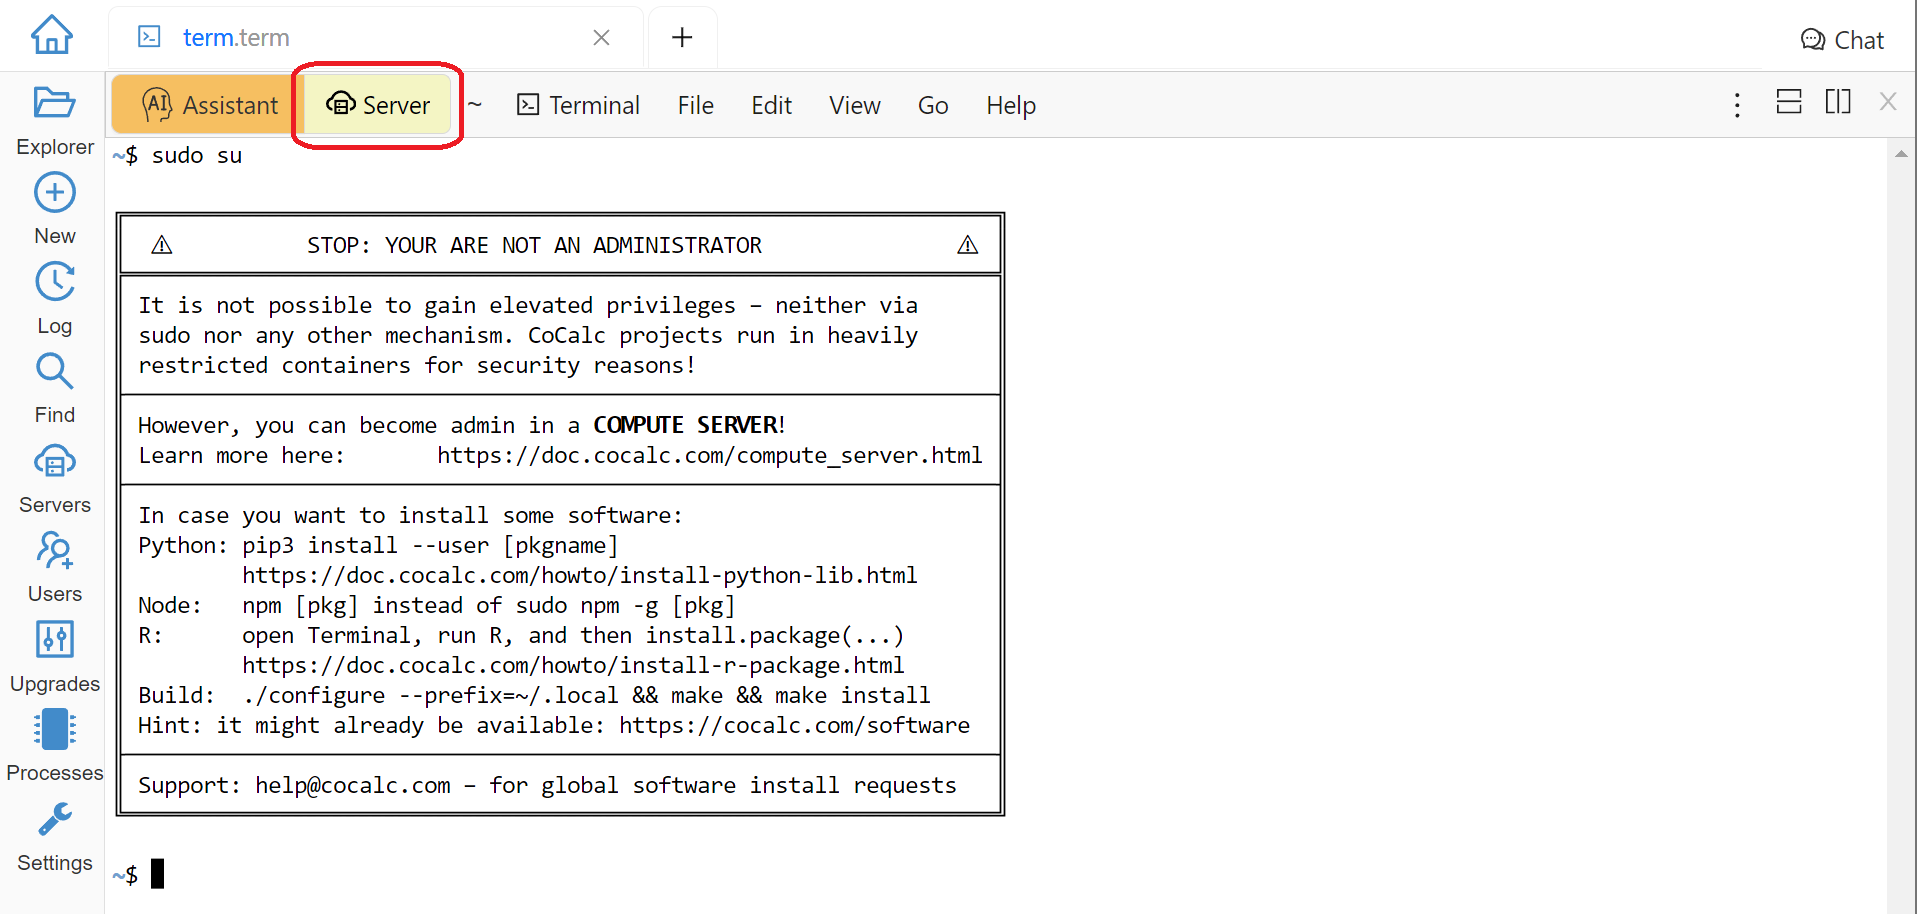
Error Message Using sudo
On a compute server it is fully possible, just make sure that your terminal is running on a compute server as explained above:

Using sudo on a Compute Server
Warning
Since you can do anything as root, you may accidentally lose access to your compute server and your data. If this happens and you do need to regain access to data, contact support at help@cocalc.com
When you become root as above, you are still inside of a Docker container that is closely integrated with CoCalc. If this creates problems for your use case, you can escape from it and become root on the actual virtual machine that represents your compute server. To do this, add SSH keys to your account (or project). Then use SSH to connect as root to localhost:
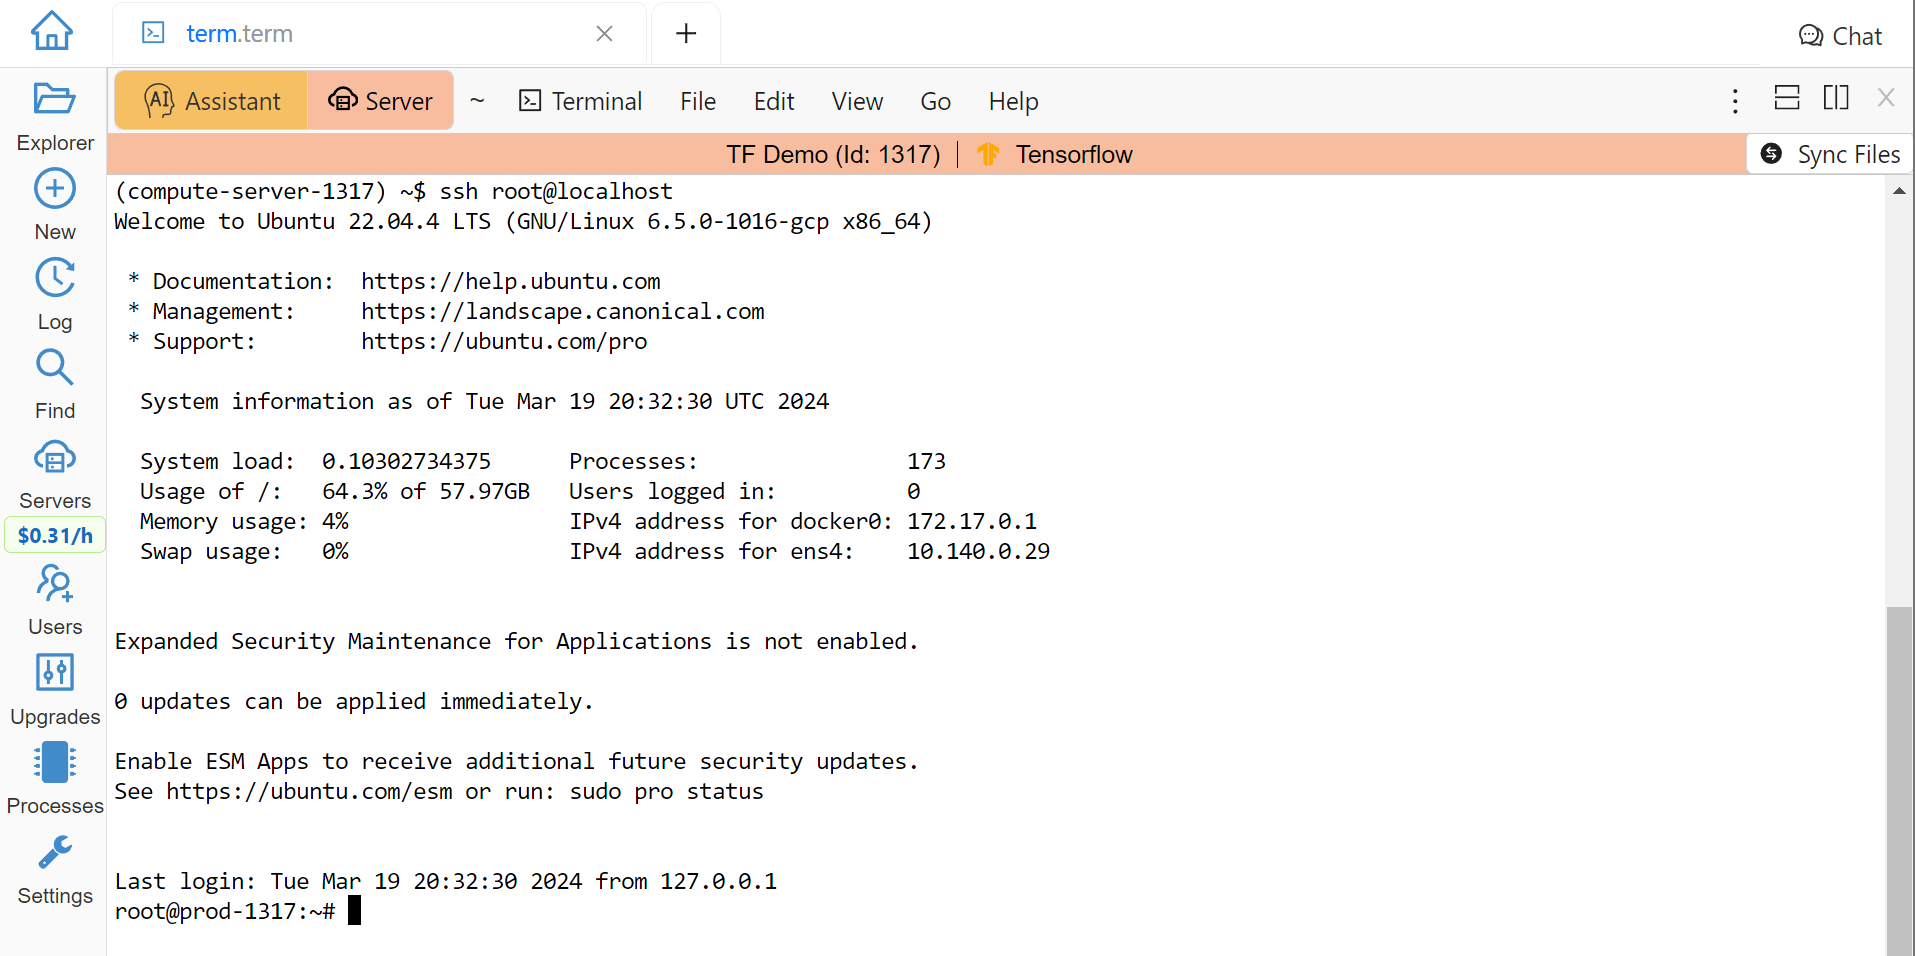
Escape from the Compute Server Container
Alternatively, you can use the external IP address of your compute server to connect to it from any other machine, bypassing CoCalc. This address is on the top of information about the server:
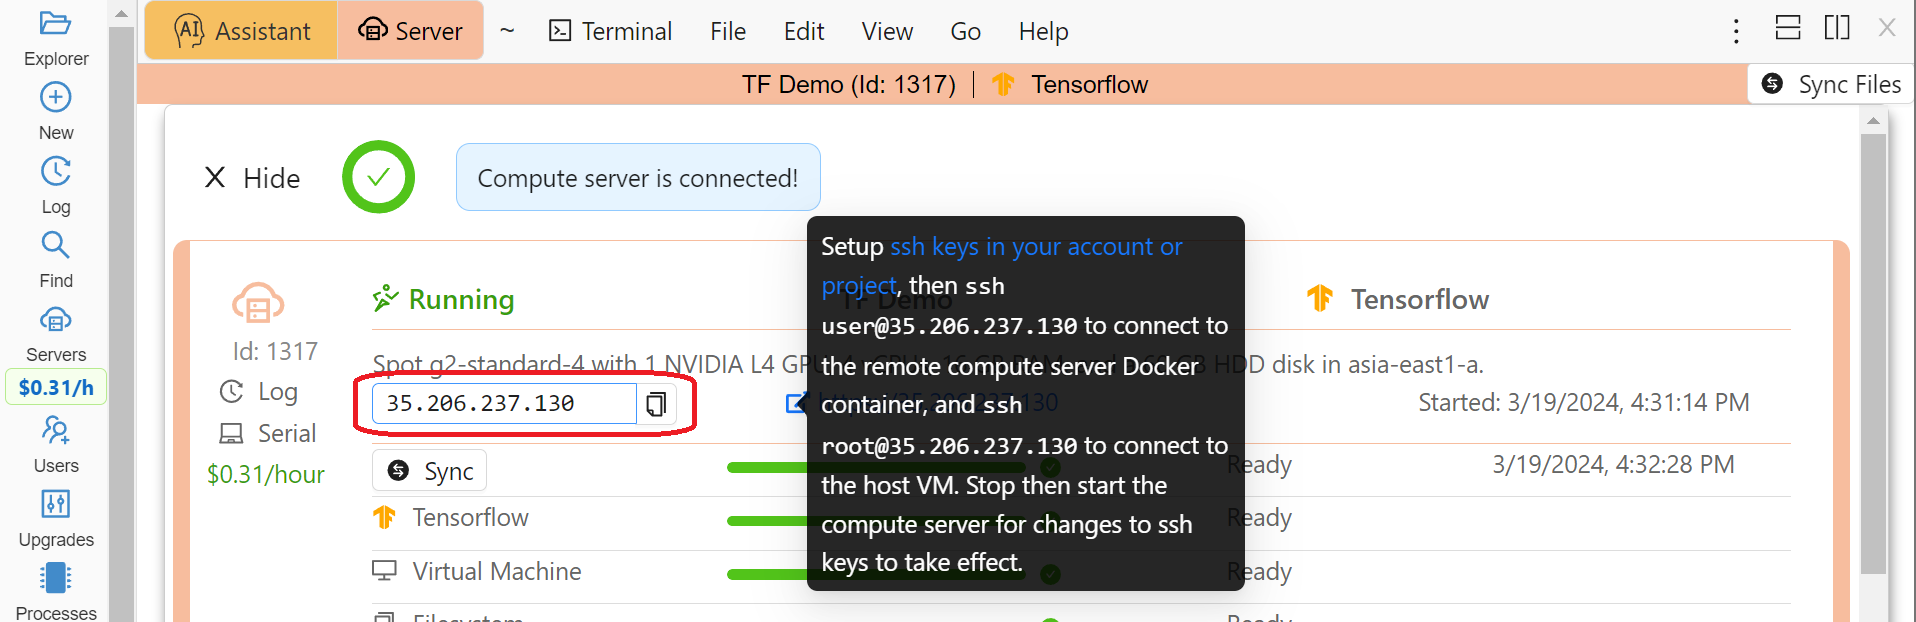
Compute Server IP Address
The same address can be used to gain access to services. If any software on your compute server instructs you to “go to http://localhost:8123”, execute
ssh -L 8123:localhost:8123 root@[server address]
on your local computer and go to http://localhost:8123 in your local browser. An interesting option to access these ports is to use X11 Desktop on your compute server.
Services Control and crontab
CoCalc projects support Project Initialization Scripts but if you want to use crontab, you have to do so on a compute server.
Inside of the compute server Docker container you can also use supervisord, but no systemd or systemctl. If you have to use the latter, use the container escape method described above in Becoming root and Port Forwarding.
One of the reasons to use supervisord is to automatically start a service, by creating a script and putting it in /etc/supervisor/conf.d/. You cannot rely on @reboot directive of cron inside of the Docker container. Check out the documentation at https://supervisord.readthedocs.io/en/latest/ and see a bunch of examples of supervisord scripts that are part of CoCalc here:
(compute-server-13) ~$ ls /cocalc/supervisor/conf.d/
code-server.conf  cron.conf        pluto.conf  xpra.conf
compute.conf      jupyterlab.conf  proxy.conf
For example, here is the one that automatically starts cron, so that crontab works:
(compute-server-13) ~$ more /cocalc/supervisor/conf.d/cron.conf
[program:cron]
command=sudo /usr/sbin/cron -f
autostart=true
As you can see, the script is very simple - just three lines. This results in automatic restart
if there is a crash, creation of proper logging in /var/log/supervisor:
(compute-server-13) ~$ ls /var/log/supervisor/
cron-stderr---supervisor-y7enleoo.log         supervisord.log
cron-stdout---supervisor-pummauzv.log         xpra-stderr---supervisor-xy4rpbm2.log
...
and you can use supervisorctl to manage services:
(compute-server-13) ~$ supervisorctl
code-server                      STOPPED   Not started
compute                          RUNNING   pid 24, uptime 0:38:40
cron                             RUNNING   pid 25, uptime 0:38:40
jupyterlab                       STOPPED   Not started
pluto                            STOPPED   Not started
proxy                            RUNNING   pid 26, uptime 0:38:40
xpra                             STOPPED   Not started
Billing for a Compute Server
A compute server is billed by the second and the price depends on its state:
Running - the server is ready to perform your tasks, you pay for all of its resources and this is the price shown when creating a server
Suspended - this is an analog of closing your laptop lid, you pay for the disk space and storing RAM state, but not for CPUs (compute servers with GPUs cannot be suspended)
Off - this is an analog of shutting down your laptop, you pay only for the disk space and local data is available to you when you start the server again
Deprovisioned - this is like writing down the model number of your laptop on paper, it costs nothing and when you start the server it will have the same characteristics, but all data that was not synced to your CoCalc project is gone.
Warning
Please note that there is still a charge in the Off state! Namely the cost of the disk. Typically it is much less than the cost while Running, but it depends on your precise configuration.
Hint
If you do not store local data on your server and do not customize the software environment, use the Deprovisioned state. You can make it the default using Ephemeral Disk setting in the server configuration.
In the example below the running cost is $0.30/hour while the disk cost is less than a penny! Notice the extra zero in $0.004 that appears when you hover over the Stop button (hovering over the cost per hour will also show the cost per month):
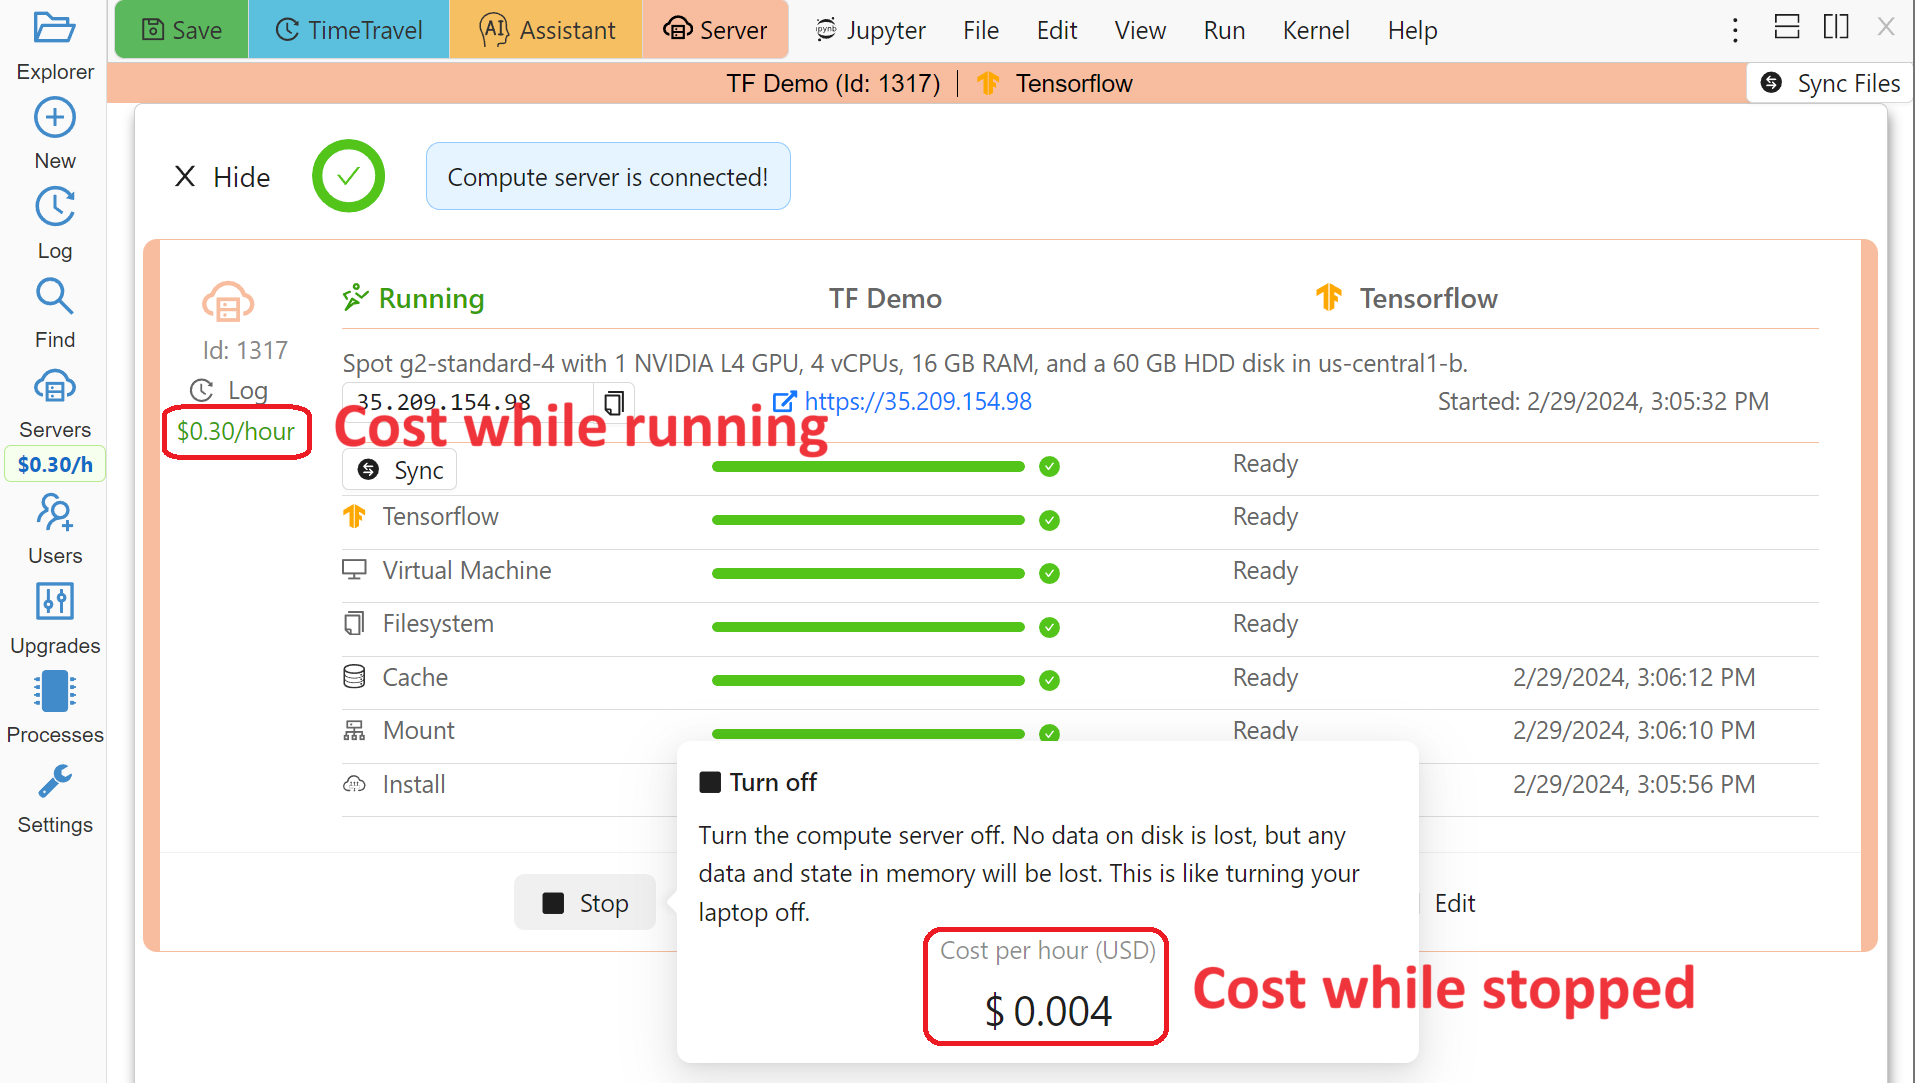
Compute Server Cost
Compute Server Filesystem
In order to smoothly and successfully use a compute server, it is essential to understand how its filesystem interacts with your CoCalc project.
For the most part, all files in your CoCalc project conveniently appear in your home folder on the compute server and you can use them in a regular way. File changes inside of your CoCalc project and on your compute server can be synced both ways. This works great for Jupyter notebooks, for example. However, this convenience is still bound by laws of physics and because of network transfers involved it is much slower than modern local disks. You are also limited by your CoCalc disk quota.
If you need to read or write massive amounts of data, e.g. for data science or machine learning, or the programs you are running operate with a lot of files, e.g. git status with a large repository, you do need to use Cloud File System or Fast Local Directories on your compute server. These directories are configured in the compute server settings when you create or edit one:
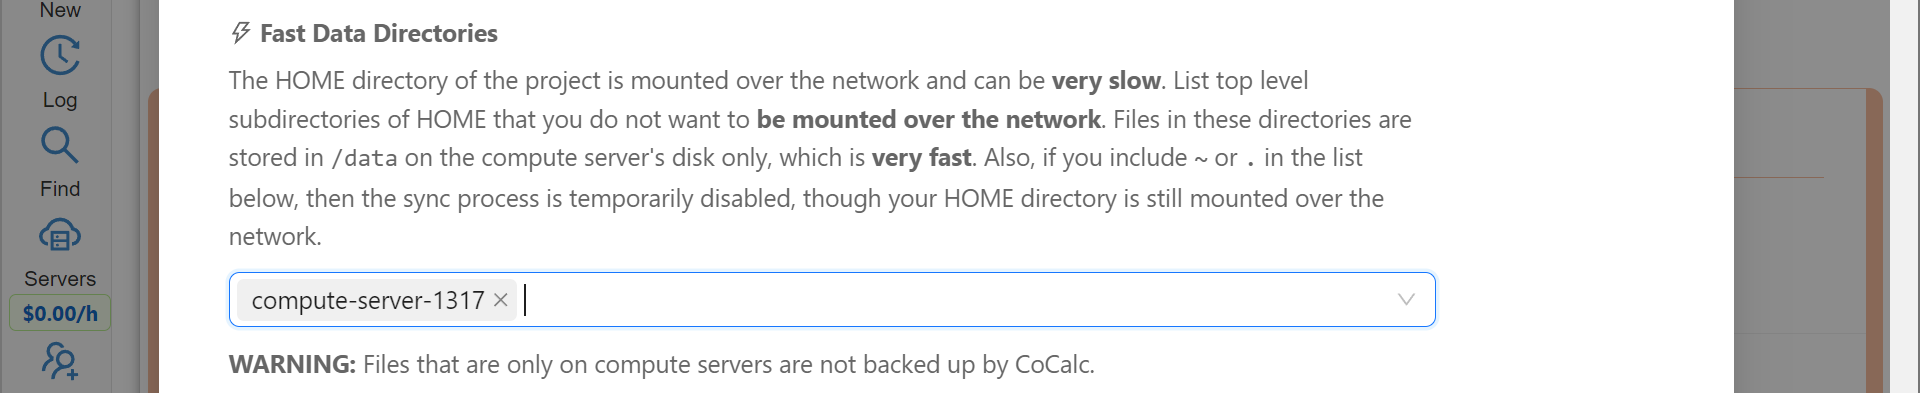
Fast Local Directories
As intended, these directories are NOT visible in your CoCalc project:
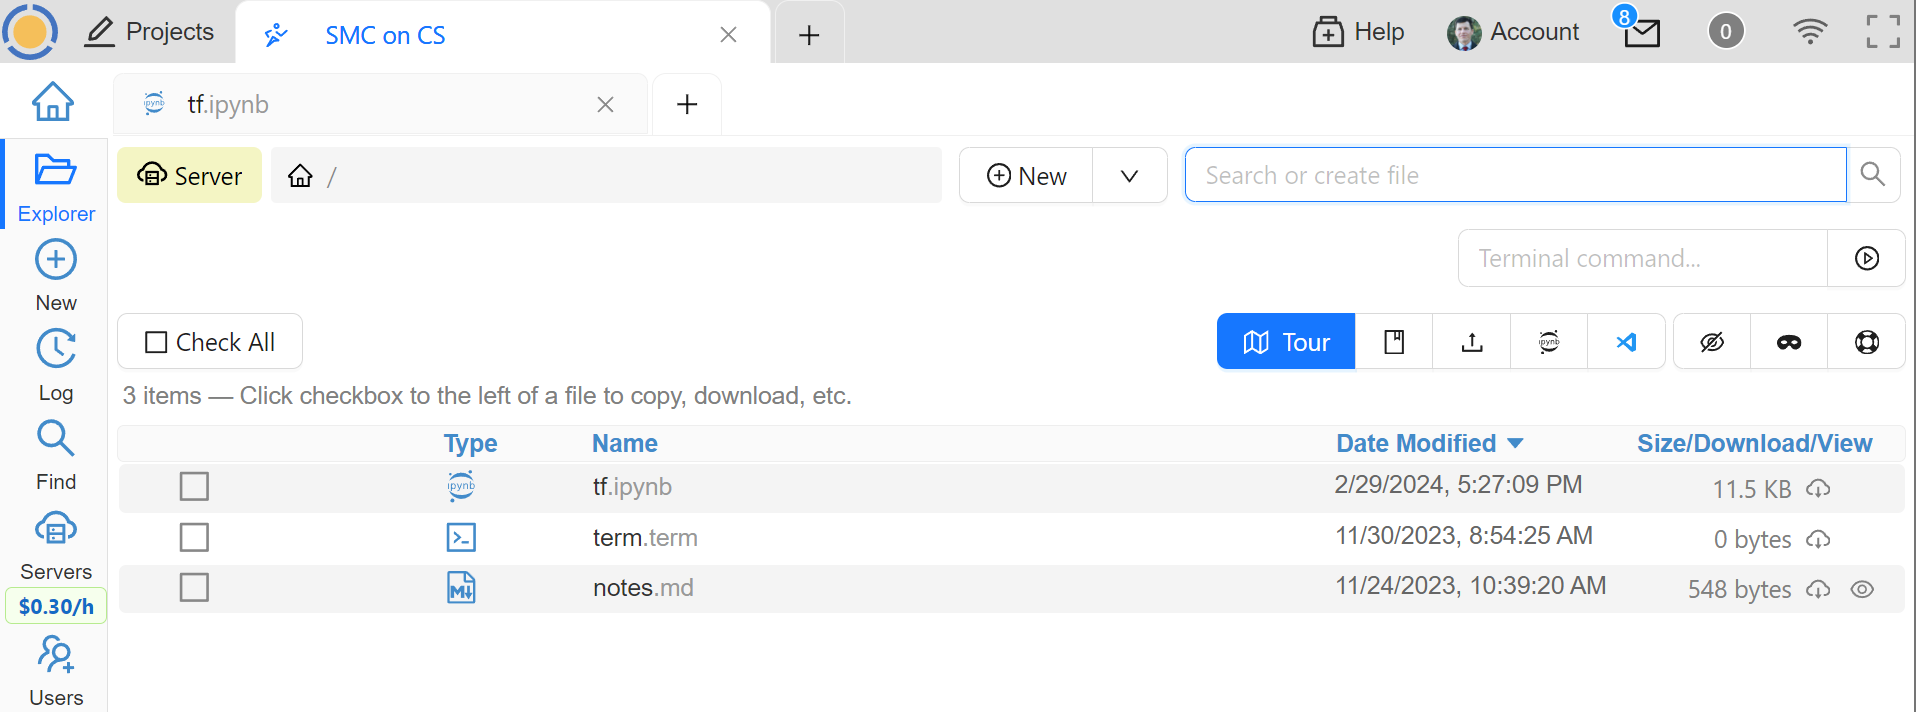
File Explorer on Project
In order to see them, to open files in them, or to open even synced files on the compute server without extra steps, connect your file explorer to the compute server in the same way as with notebooks and terminals, using the Server button. Now the Fast Local Directories are visible (you can certainly have more than one):
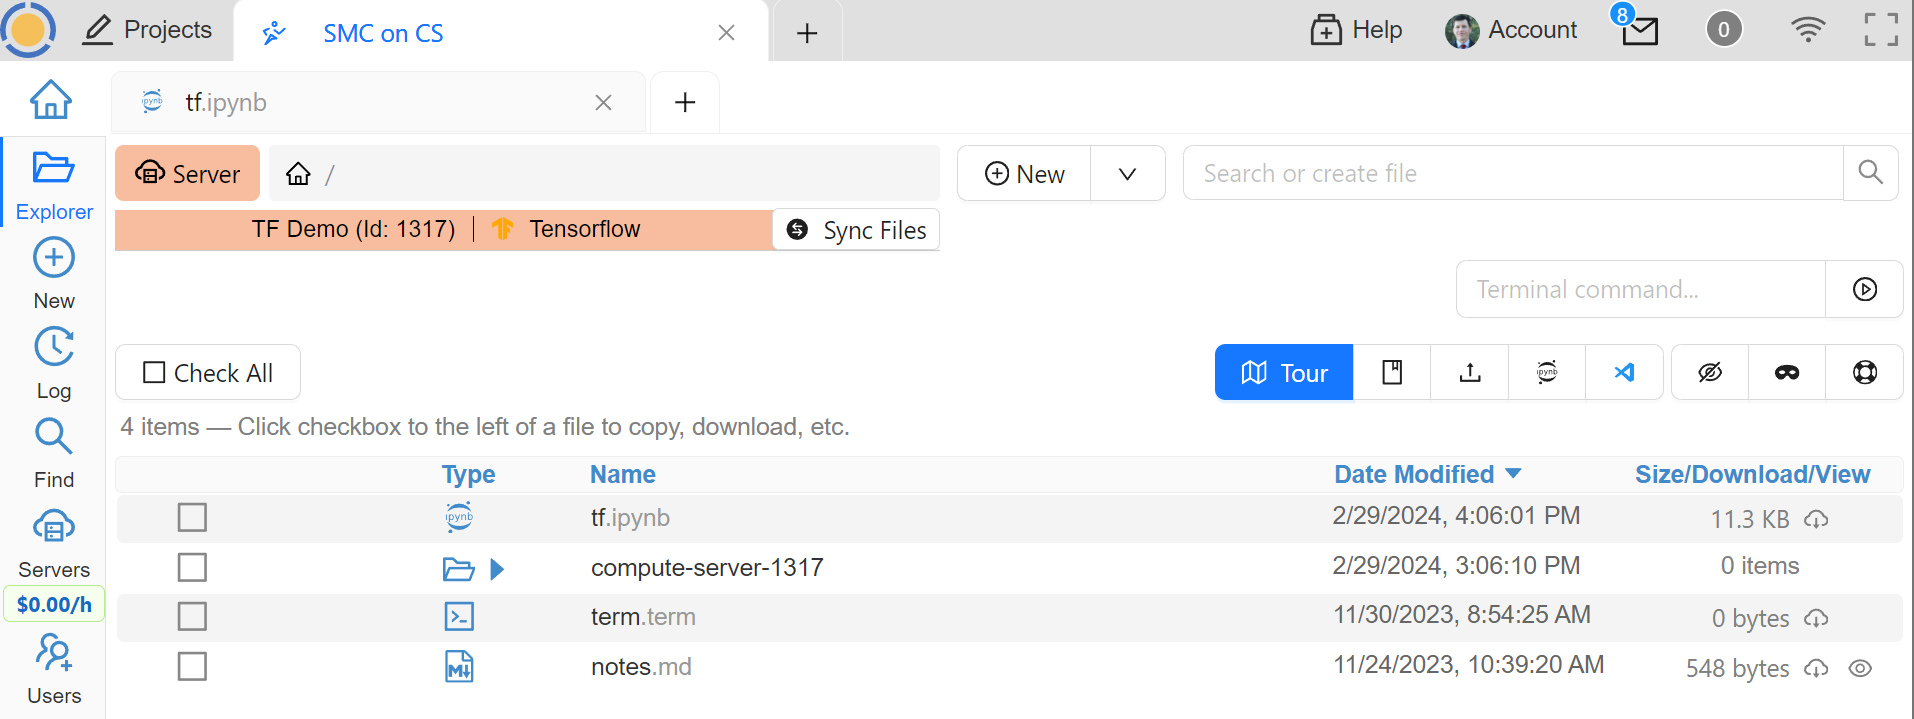
File Explorer on Compute Server
When you edit files via CoCalc graphical interface, they are usually synced between the project and the compute server automatically. However, if you are using vim or some other tool in a terminal, or just want the files to be synced immediately, you may need to click the Sync Files button:
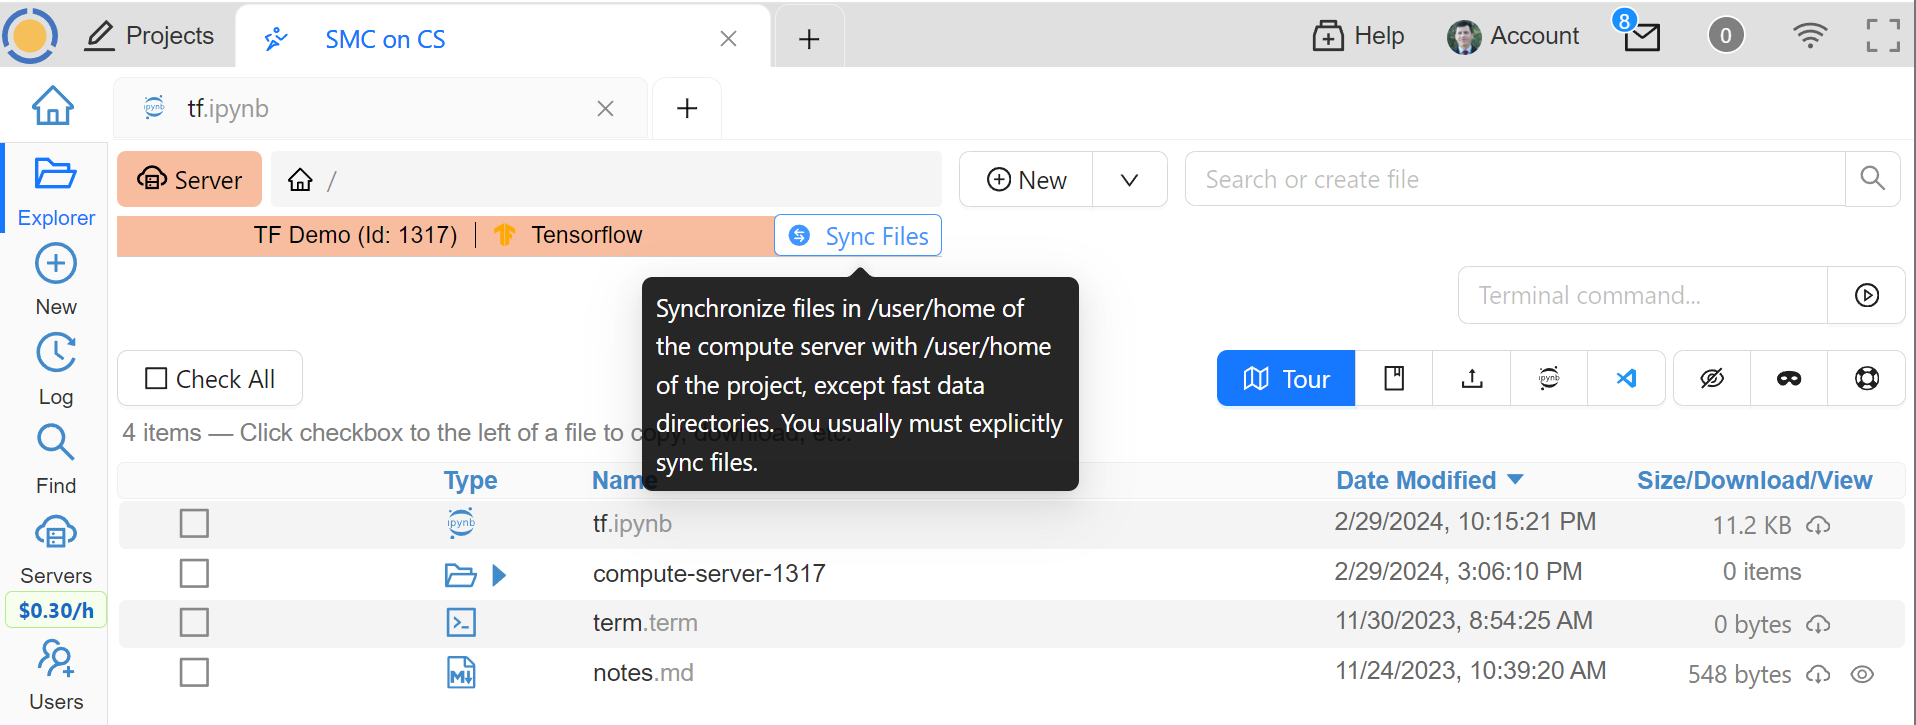
Sync Files Button for a Compute Server
Note
Hidden “dot” files in the home directory are treated in a special way since typically they serve some special function. In particular:
all dot files are visible on the compute server over the network mounted file system
if you access any hidden file and click Sync or wait about ~30 seconds, that file is copied over to the compute server so subsequent access is faster
these files are never synced back to the Home Base
all changes to a hidden file in the Home Base are ignored after the first change on or sync to the compute server
Backups
Apart from the synchronization with the Home Base described above and corresponding backups of the Home Base, there are NO automatic backups on compute servers. We do plan to support some options for it eventually, but it will be up to the user to determine what makes sense. It is always a very good idea to backup your important data to some external service completely outside of CoCalc. For example, we use https://www.backblaze.com/ for some of our own backups.
Compute Server VPN
In addition to Internet access using standard tools, your compute servers in the same project can communicate with each other over encrypted VPN. You can refer to your servers either using compute-server-nnnn names or, if you have configured a subdomain https://server_name.cocalc.cloud, using server_name. Here is quick example of a terminal session on a compute server:
(compute-server-1268) ~$ more /etc/hosts
...
### COCALC VPN -- EVERYTHING BELOW IS AUTOGENERATED -- DO NOT EDIT
10.11.12.242 compute-server-1268
10.202.0.87 internal-1268
34.162.173.49 external-1268
10.11.211.165 compute-server-4300
10.11.211.165 fire
10.0.3.110 internal-4300
149.36.0.137 external-4300
(compute-server-1268) ~$ sudo apt install -y iputils-ping
...
(compute-server-1268) ~$ ping compute-server-4300
PING compute-server-4300 (10.11.211.165) 56(84) bytes of data.
64 bytes from compute-server-4300 (10.11.211.165): icmp_seq=1 ttl=64 time=231 ms
64 bytes from compute-server-4300 (10.11.211.165): icmp_seq=2 ttl=64 time=114 ms
...
(compute-server-1268) ~$ ping fire
PING fire (10.11.211.165) 56(84) bytes of data.
64 bytes from compute-server-4300 (10.11.211.165): icmp_seq=1 ttl=64 time=114 ms
64 bytes from compute-server-4300 (10.11.211.165): icmp_seq=2 ttl=64 time=114 ms
...
All traffic is fully encrypted and all ports are open, so you have complete freedom in configuring services that run over this VPN. IP addresses of the form 10.11.x.x remain fixed for the lifetime of the compute server.
Current limitations (that may be removed in the future):
the CoCalc project itself is not on this VPN
you can connect from any to any server, mixing different clouds and OnPrem, except two OnPrem compute servers
when you create a new server or configure a domain name for an existing one, you may need to wait a few seconds before the new name will become resolvable
Choosing a Cloud
It is impossible to choose “the best cloud” for compute servers overall, which is why CoCalc integrates with many of them! For each particular use case one may be more or less preferable - sometimes it may be obvious, sometimes it requires experimentation, and sometimes the difference is inconsequential. The purpose of this section is to highlight some points to consider when choosing a cloud, hopefully it will make this task easier for you.
Cost
This may be the most obvious criterion, but while we strive to be as transparent as possible with the cost of running a compute server, do keep in mind also that:
there is a cost for the disk space when the server is off;
there may be some charge for network traffic, typically it is small compared to compute resources, but it does depend on your use case;
it may be more cost effective to use a configuration that is more expensive per hour if it allows you to complete your computations faster, thus paying for fewer hours.
Availability
This one may be less obvious than the cost, but it is even more important - the price of a compute server does not matter if you cannot start it! In most cases once you managed to start a compute server, you can continue using it until you explicitly turn it off. However, there is no guarantee that you will be able to start the same machine again in a few days - other users may utilize all resources.
Geographic Location
Your organization may impose strict requirements on where your data are stored and processed. Other factors to consider:
latency for interactive work: a server close to you may be best if you directly use web services started on it, while
us-east1-dmay be optimal to use CoCalc editors;some “remote” regions may have attractive cost and/or availability;
network speed and cost, if you expect a lot of traffic.
Special Considerations
You may want to use a data centre satisfying particular requirements on sustainability, security, etc. We try to expose as much information about our cloud providers as possible to help our users to make an informed choice.
Let’s take a look now at some of the unique benefits of our cloud providers!
Google
Vast selection of varied configurations!
For computationally intensive tasks, do take a look at higher end machines. We had customers with very strict requirements on interconnect network between cluster nodes, but it turned out that Google had single nodes with enough vCPUs, eliminating the need for a cluster setup!
Spot instances offer up to 10x lower prices, if your work can deal with potential interruptions!
Hyperstack
Apart from cost and speed, Hyperstack prioritizes sustainability of their data centres. They are 100% powered by hydro-electricity and are located in Canada and Norway to benefit from lower ambient temperature for air cooling.
You can see how many GPUs are available on Hyperstack at any given time and estimate your chances of being able to get what you need in the future.
OnPrem
You are in full control of the machine you are using.
At the moment OnPrem compute servers are free, the intended cost when their development is finished is about 1/3 of a similar spot instance on Google. If you already own sufficient compute resources, this may be the most cost-effective option to benefit from the cloud and collaboration as well!
Troubleshooting
I Cannot Start My Compute Server
If your compute server is not running, “it does not exist” in the sense of physical CPU cores, RAM, and GPU. When you try to start it, the first step is to allocate these resources to you which may not always be possible. Some of the options that you may (or may not) have:
pick a different region
pick a different configuration
switch from a spot instance to a standard one
contact us for advice
Hint
If it is important to you that a particular machine, especially with a high end GPU, is available, consider leaving your server on even when not in use. You will have to pay for this idle time, but your chance of losing access to this machine is very low (probably less than 0.1%). Alternatively, consider storing your data not just on the compute server, e.g. use Cloud File System.